Free Shipping Within 48 States!
Menu
-
-
Painted Car Parts
-
Touch Up Paint
-
Vehicle Conversions
- Chevrolet Camaro: LS/LT to SS Front Bumper Conversion (For 2010-2013 models)
- Infiniti Q50: Q50 to Q50s Sport Front Bumper Conversion (For 2014-2017 models)
- Lexus CT200H: CT200H to F-Sport Front Bumper Conversion (For 2011-2017 Models)
- Scion FRS to Toyota 86 Front Bumper Conversion (For 2013-2016)
- Toyota Tacoma: 3rd Generation TRD Hood Conversion (For 2016-2020 models)
- Toyota 4Runner: Hood and Scoop Conversion (for 2010-2022 Models)
- Toyota Tundra: Chrome Delete Conversion Kit (For 2022 Model)
- Toyota Tacoma: Rear End Caps Chrome to Painted Conversion (For 2016-2023 Models)
- Request Conversion Parts
-
Painting Services
- Customer Reviews
- Request Car Part
-
- PAINT MATCH GUARANTEE
- FAQ
- HELP
- ORDER STATUS
- 281-561-5300
- Login

Free Shipping Within 48 States!
How to Remove a 2014 to 2019 Toyota Corolla Fender
Your 2014 to 2019 Toyota Corolla fender replacement looks more difficult than it is. If you have never worked on a car before, it can seem daunting, but it's not! If you can open a jar of pickles, you're already strong enough.
The little sibling to the invincible Toyota Camry, your Corolla, regardless of the year, will last forever. Of course, you have to maintain the fluids, but this is one awesome vehicle that you want to keep looking as good as it runs!
You just need a few simple tools that you probably already own. More importantly, you'll need to know the correct steps to remove your old damaged fender. Once you know how to remove the fender, putting it back will be easy and fast.
Here at ReveMoto, we offer brand new pre-painted auto parts that are guaranteed to fit, color-match, and we have a lifetime warranty on all of our paint jobs. If you are more of a visual learner, you head over to our YouTube Channel and watch our great tutorial videos.
For this fender removal, you'll need:
10mm socket with a socket wrench
An extension
A flathead screwdriver
A panel clip removal tool (or a flat-head screwdriver)
Yellow tape
Most folks don't have a panel clip removal tool, so you can substitute a flat-head screwdriver. The yellow tape is optional, but helps prevent you from scratching the adjacent panels when removing and installing the fenders.
Let's get started with your Corolla fender replacement:
1. Tape off the adjacent panels. Start off with the pillar, hood, bumper, and door.
2. Turn the wheel to remove the fender liner pins/screws. It will give you more room.
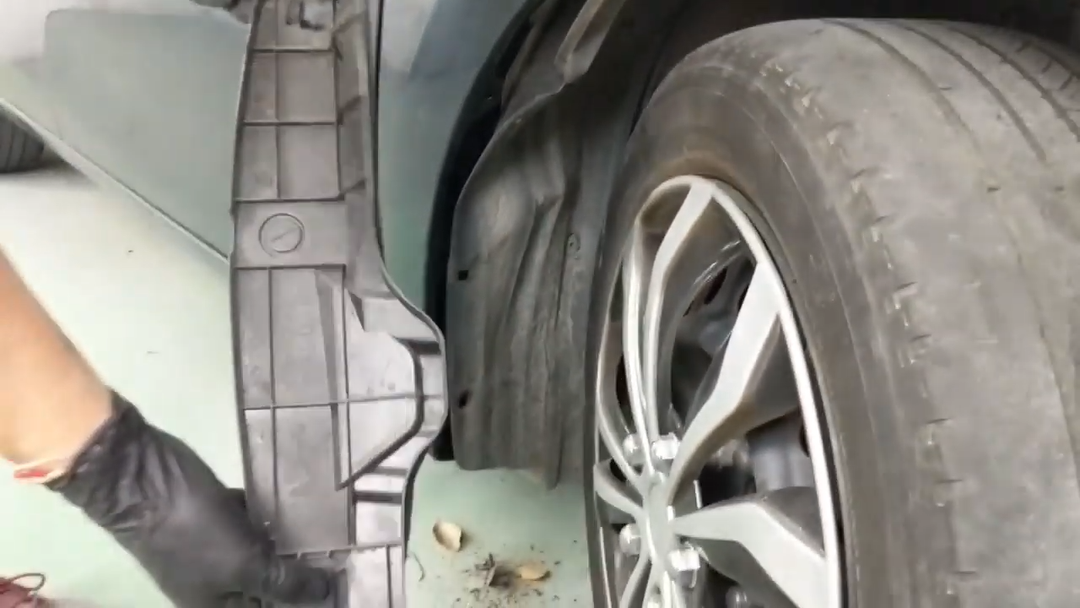
3. Detach the fender liner from the fender. Start at the very bottom, under the door/fender. With a flat-head screwdriver, remove the plastic push pin underneath and continue with four more similar push pins around the fender liner.
4. There is a small push pin on the fender liner right where the fender and bumper meet. Remove it using a flat-head screwdriver.
5. Next is a larger pushpin. With this one, you need to twist it first to the left before you remove it like the others.
6. Remove the two bolts connecting the fender liner and splash shield found underneath the fender/front bumper part using a 10-millimeter socket wrench.
7. Remove the three bolts found on top of the fender.
8. The first bolt secures the headlight to the fender. Once that bolt is off, pop the headlight off the fender.
9. Pop the corner of the bumper from the fender to the headlight off. Just pull it out until you hear it snap off.
10. Slightly push the bumper away, and remove the bolt below the bracket using a 10 mm socket wrench.
11. Remove the three bolts found on the bracket.
12. Next step is the cover found in between the fender and the door. With a little bit of force, push it up.
13. Using your socket wrench, remove two bolts: one found under the removed cover and another just below it at the door opening.
14. Underneath, where the fender and door meet, remove two bolts.
15. Remove the plastic piece behind the fender.
16. Behind the plastic piece you removed, use a 10-millimeter socket wrench to remove the bolt.
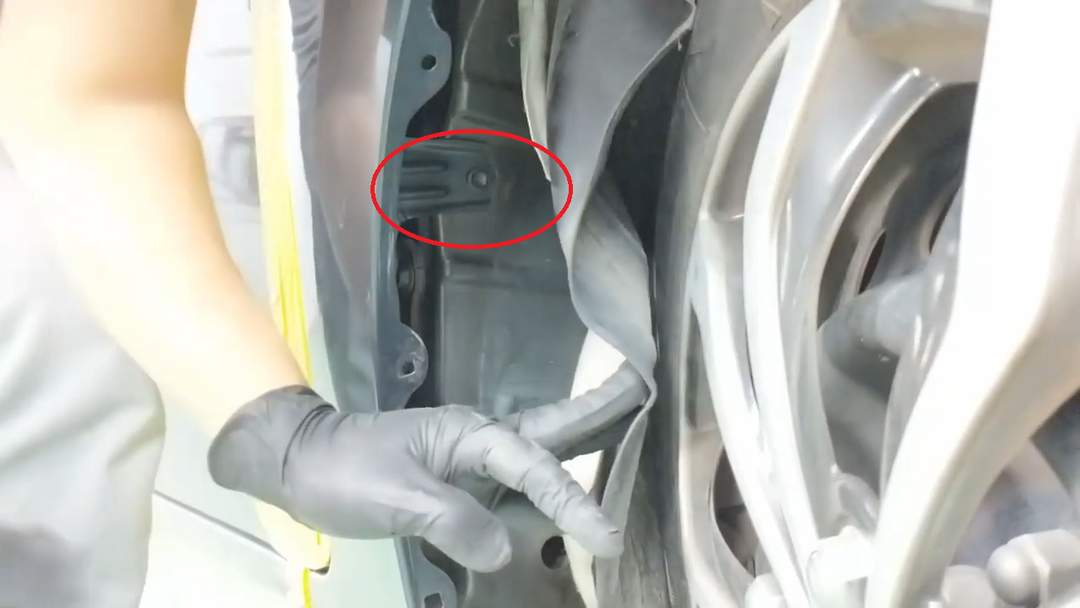
Additional Step: Your fender still isn't moving because there is a bolt hidden behind the fender liner. Behind the fender liner, there is a hard plastic cover. Honestly, we're not too sure what this cover does. Maybe it's for noise cancellation, or Toyota engineers thought it would be funny to make our lives just a little bit worse. It's likely to stop debris from getting in behind your fender.
How to remove it: There is a small circle cap/pin that you need to remove to loosen the cover. Don't worry about damaging the cover. It's plastic, so just pull it out forcefully. There is one lonesome 10mm bolt behind that cover. Remove that bolt and you should be home free!
17. Pull out the plastic piece found near the windshield cowl.
18. Pull the rubber piece to expose the bolt underneath.
19. Use an extension to remove the bolt.
20. Remove the fender by pulling it towards the headlight and away from the vehicle.
Installing your fender is so much easier now that you have finally removed the old fender. Essentially, you just need just work in reverse.
Be sure to fit the fender in snuggly. Our replacement parts should fit as well as your original equipment fender. Some accidents can have some unforeseen damages behind the panel, so make sure that the brackets and frame are not bent in any way. This could affect the fitment of the fender.
You also want to make sure that the spacing between the fender and the hood is not too close or too far apart. It's best to check the opposite side for reference. Run your finger between the panels and if your finger at any moment goes too far in or it gets pinched, there is a spacing issue. Ultimately, it depends on the look you are going for. To fix this, just identify what you need to fix, loosen the bolts, and slightly push the fender to the desired spacing.
If there are any issues, questions, or concerns, don't hesitate to chat online with our staff. We knew you could tackle this job on your own!
Our video for the removal process is down below and at the end, it links to the Toyota Corolla fender install video.
Good luck!
DISCLAIMER: While ReveMoto tries to make the information in this blog as accurate as possible, we make no claims, promises, or guarantees about the accuracy, completeness, or applicability of the content. No information contained in this blog shall create any expressed or implied warranty or guarantee of any particular result. All do-it-yourself (DIY) projects entail some risk. It is the sole responsibility of the viewer to assume this risk. ReveMoto is not responsible or liable for any loss, damage (including, but not limited to, actual, consequential, or punitive), liability, claim, or any other injury or cause related to or resulting from any information posted in this blog.


