Free Shipping Within 48 States!
Menu
-
-
Painted Car Parts
-
Touch Up Paint
-
Vehicle Conversions
- Chevrolet Camaro: LS/LT to SS Front Bumper Conversion (For 2010-2013 models)
- Infiniti Q50: Q50 to Q50s Sport Front Bumper Conversion (For 2014-2017 models)
- Lexus CT200H: CT200H to F-Sport Front Bumper Conversion (For 2011-2017 Models)
- Scion FRS to Toyota 86 Front Bumper Conversion (For 2013-2016)
- Toyota Tacoma: 3rd Generation TRD Hood Conversion (For 2016-2020 models)
- Toyota 4Runner: Hood and Scoop Conversion (for 2010-2022 Models)
- Toyota Tundra: Chrome Delete Conversion Kit (For 2022 Model)
- Toyota Tacoma: Rear End Caps Chrome to Painted Conversion (For 2016-2023 Models)
- Request Conversion Parts
-
Painting Services
- Customer Reviews
- Request Car Part
-
- PAINT MATCH GUARANTEE
- FAQ
- HELP
- ORDER STATUS
- 281-561-5300
- Login

Free Shipping Within 48 States!
How To Convert Your 2011-2017 Lexus CT200H Base Model to Look Like The 2014-2017 F-Sport
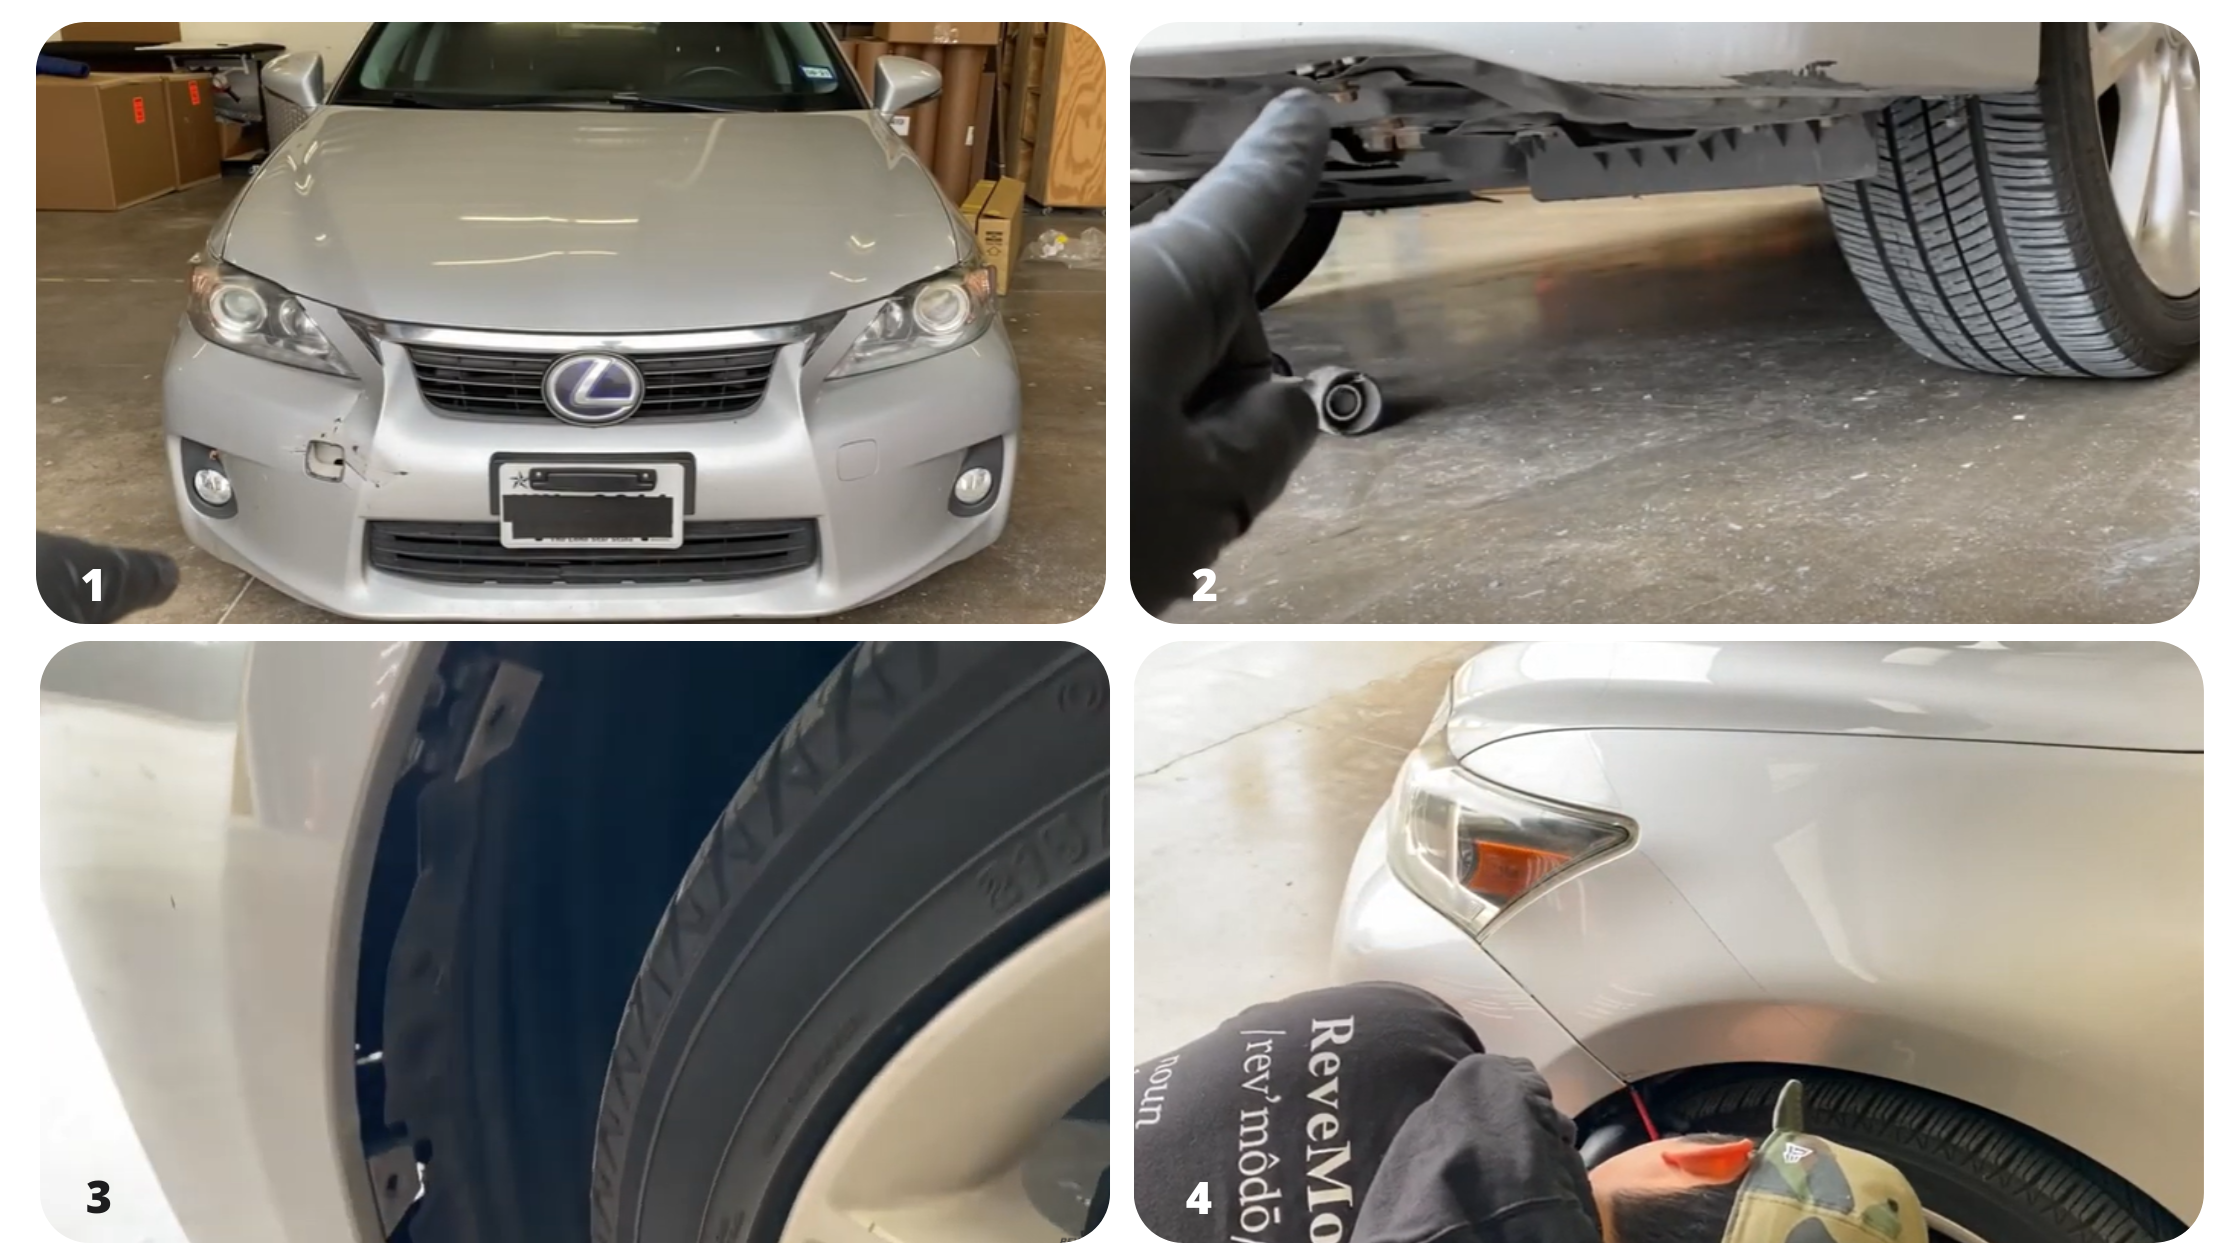
You can now change the look of your 2011-2017 Lexus CT200H Base Model to look like the 2014-2017 Lexus CT200H F-Sport. ReveMoto now offers the conversion kit you'll need which includes the paint to match front bumper and spindle grille.
You'll need the following:
Front Bumper Conversion Kit
A wrench or a socket wrench with a 10mm socket
A Phillips screwdriver
A flathead screwdriver or a panel clip removal tool
Razor
The Old Bumper
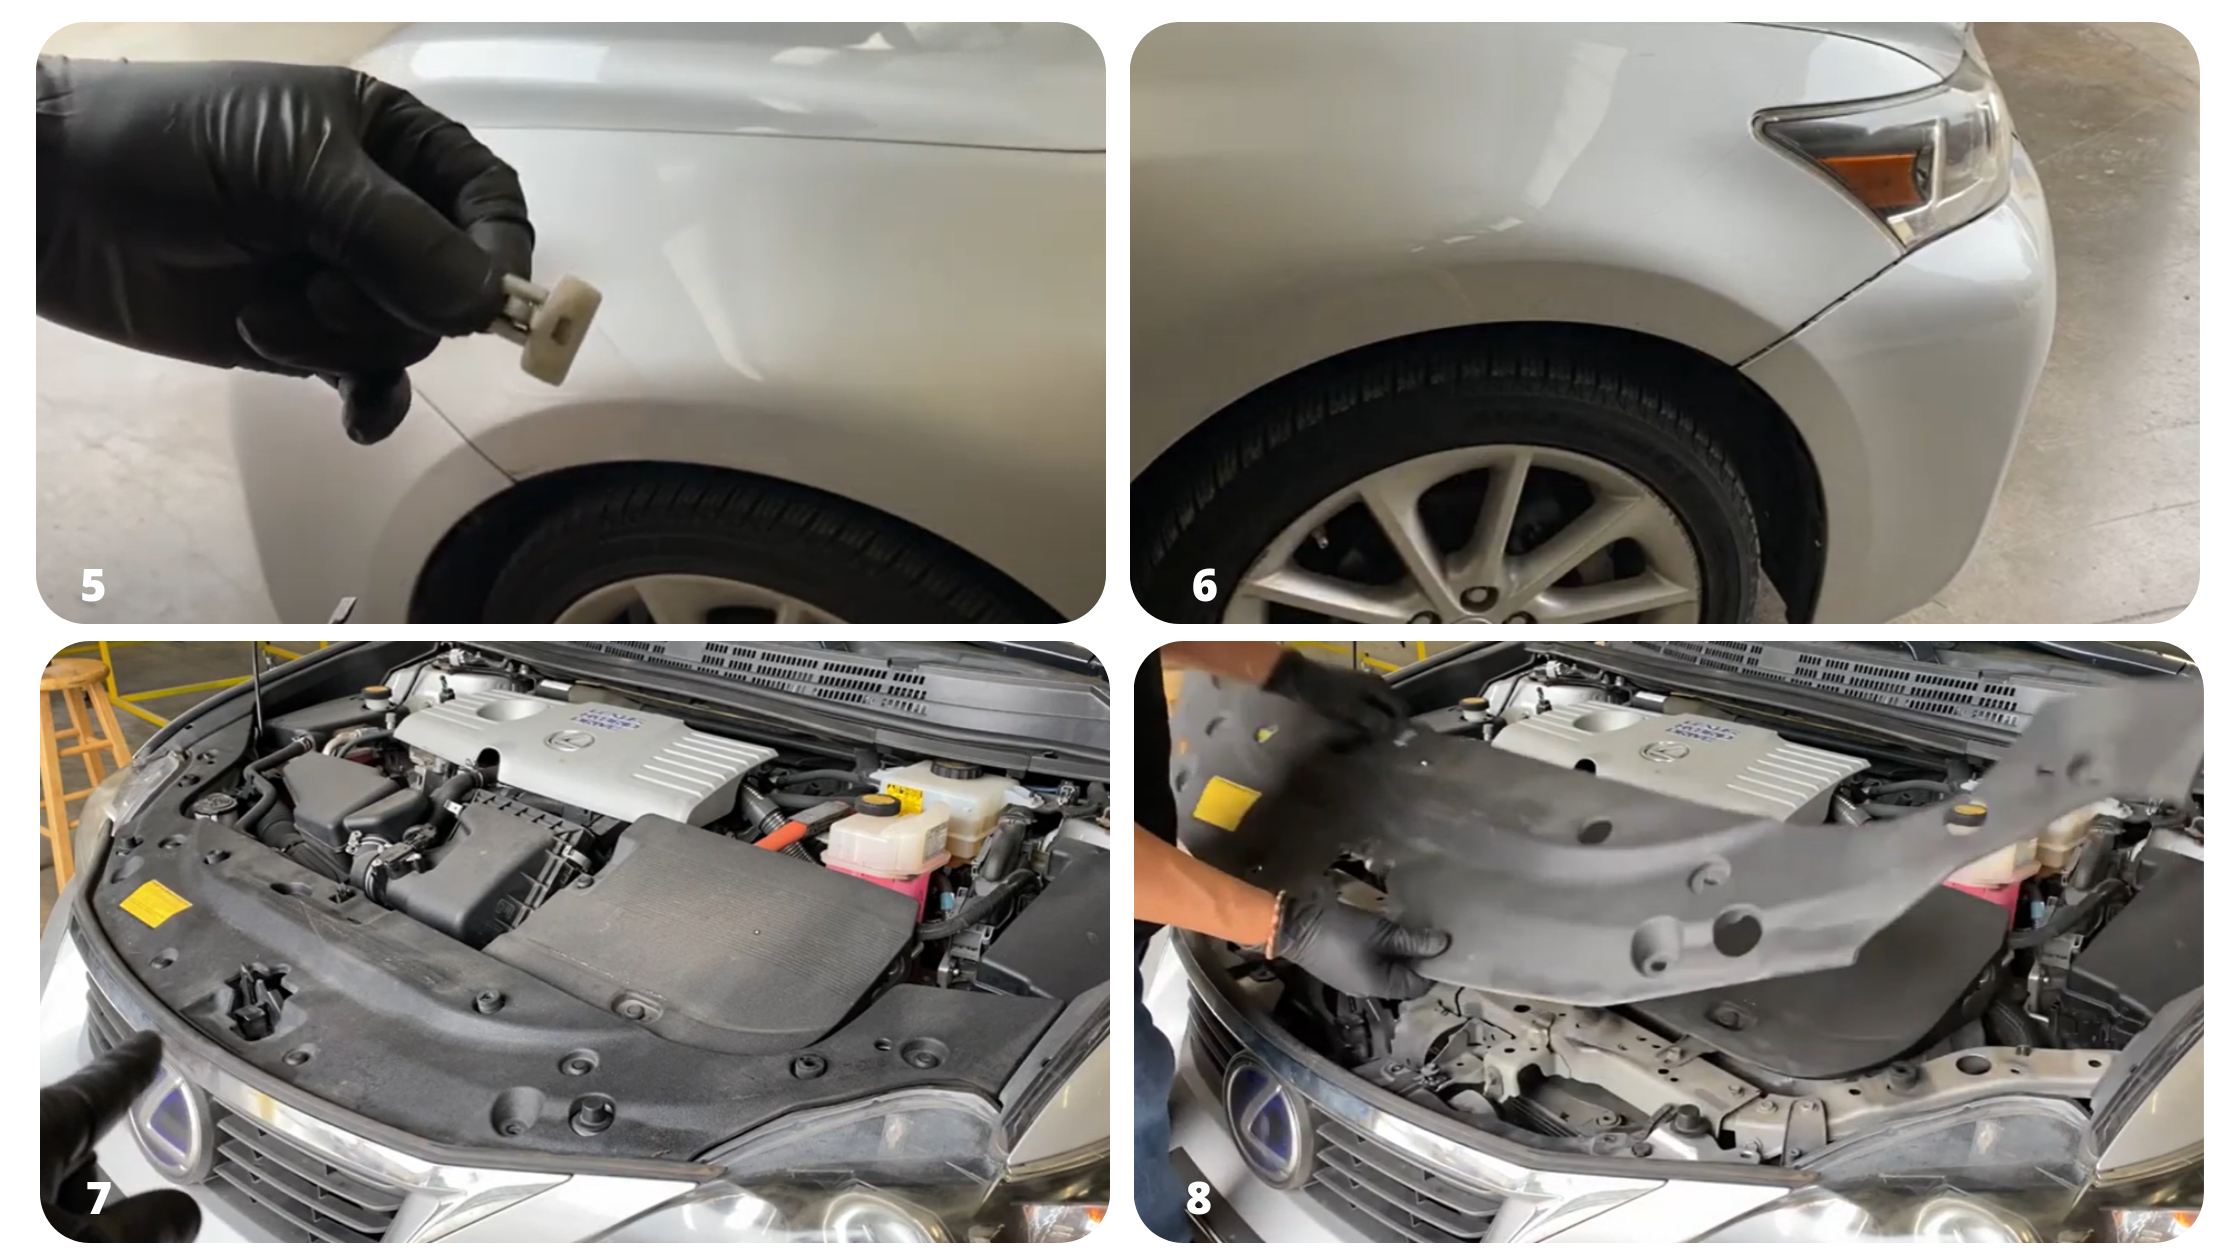
1. There are around six screws at the bottom that need to be removed.
2. These screws can be removed using a socket wrench with a 10mm socket.
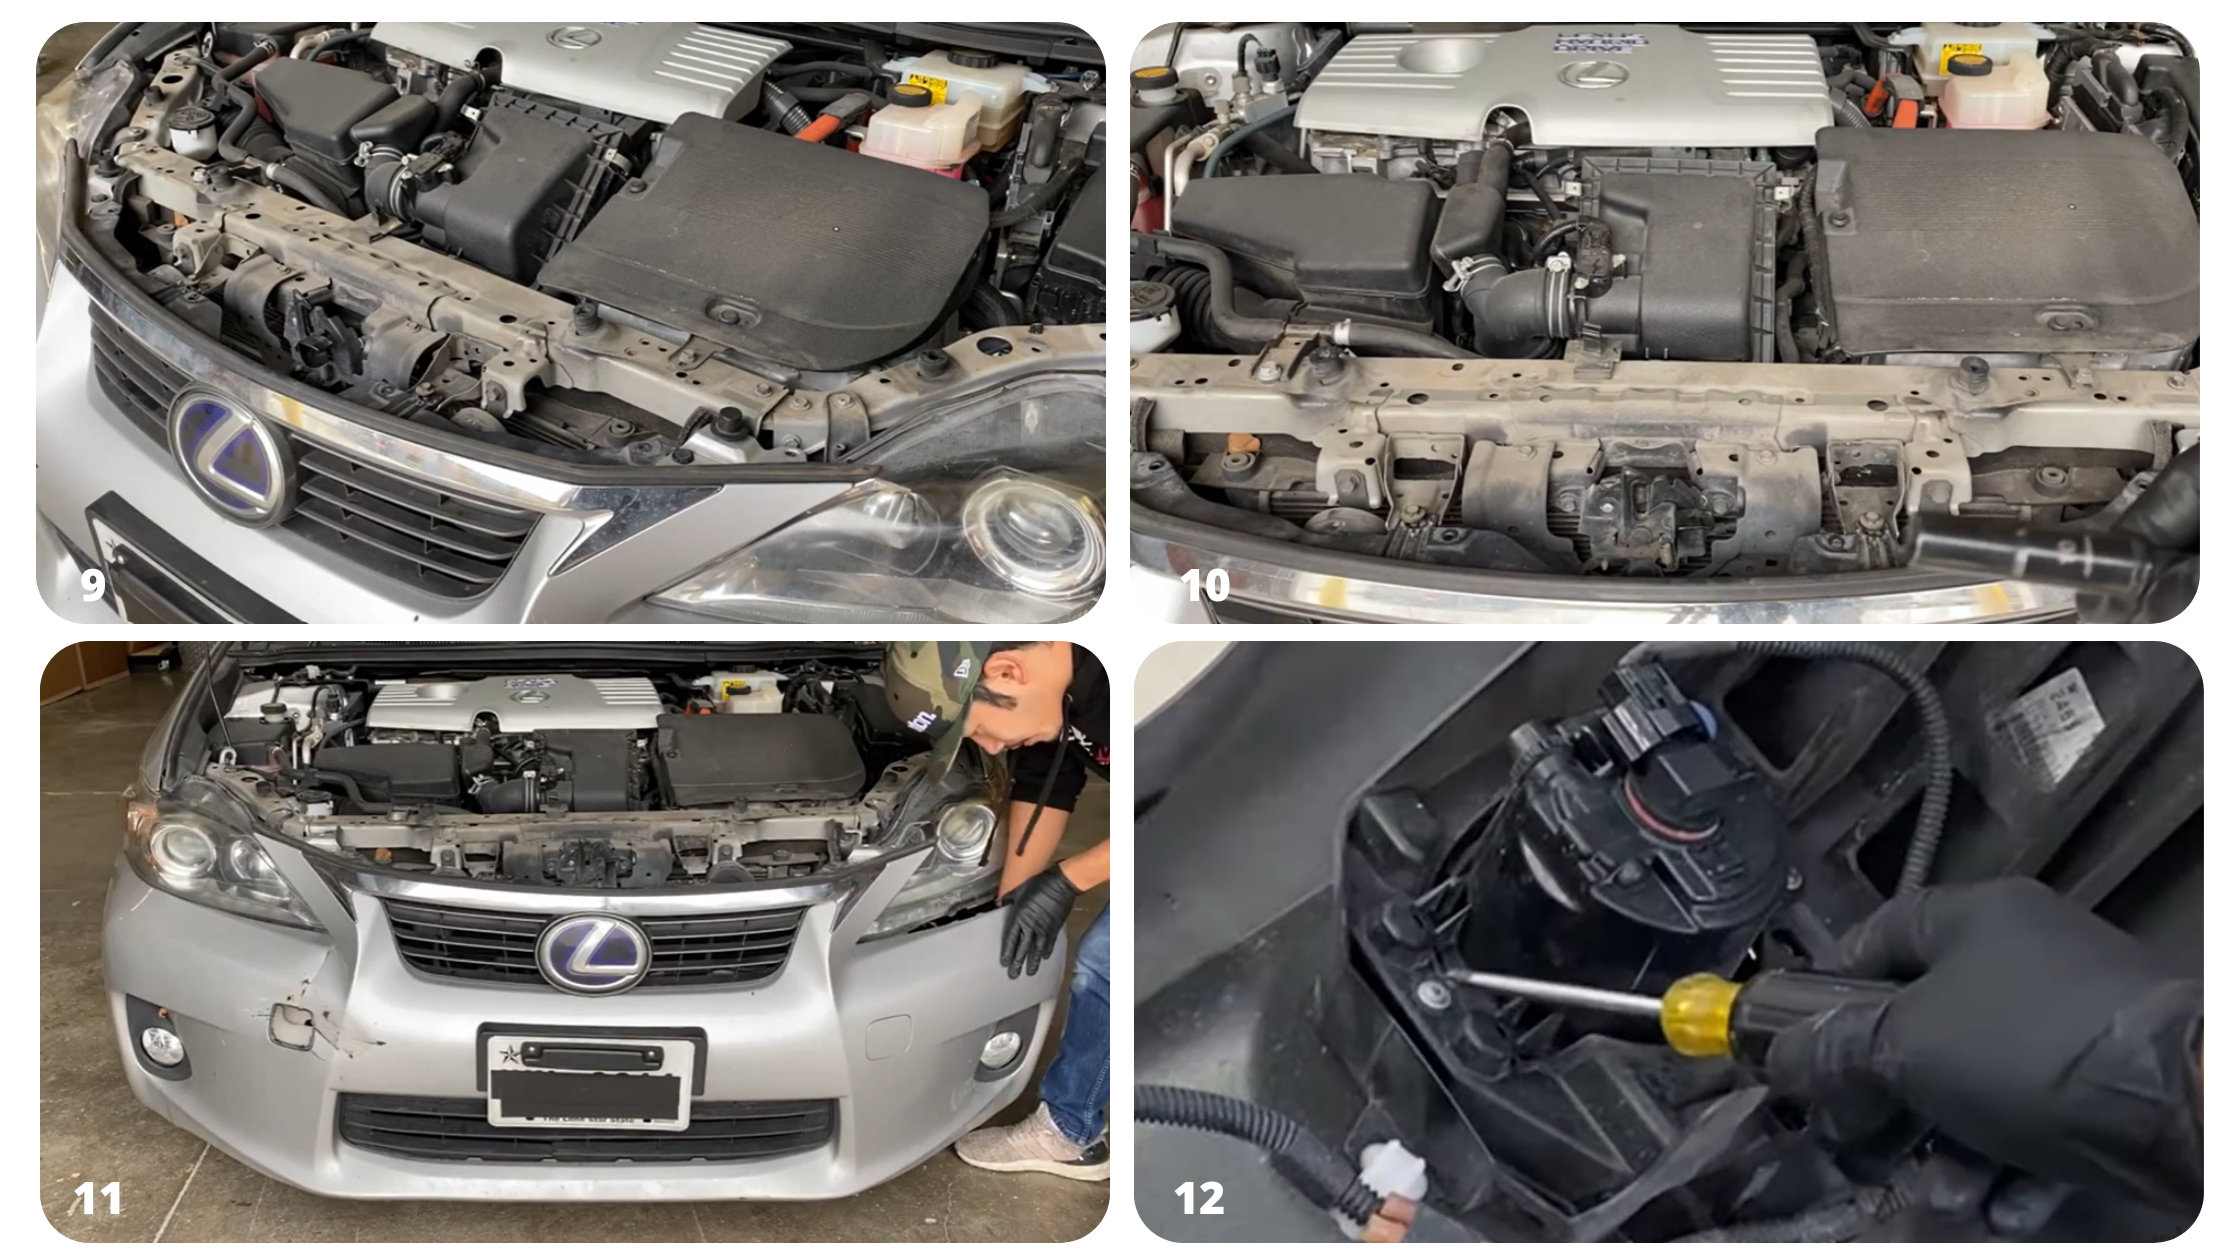
3. Detach the fender liner.
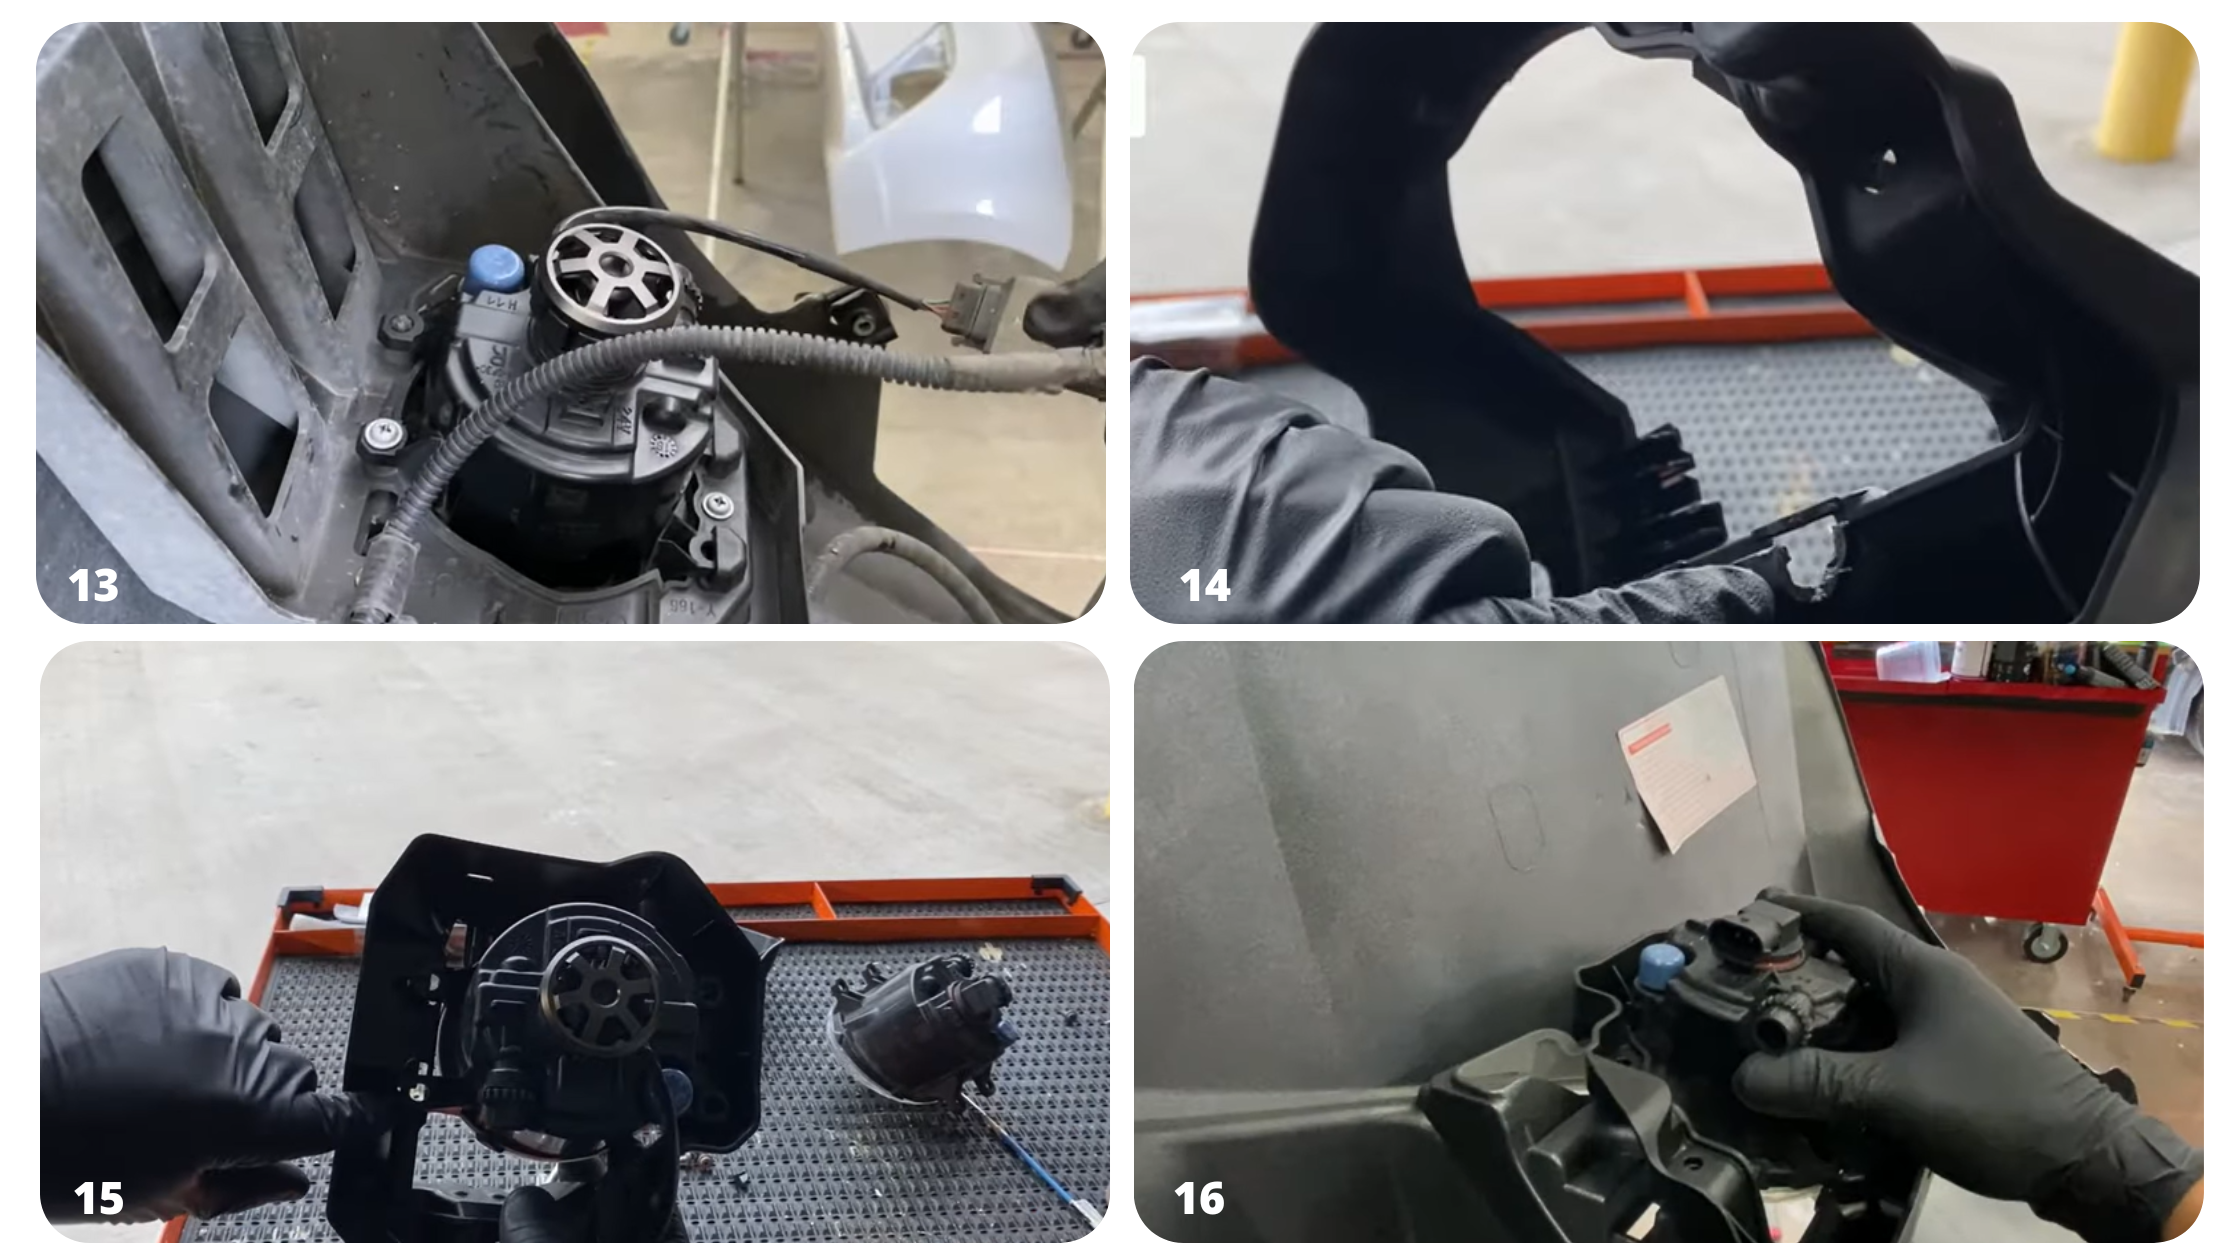
4. Remove the clip from the bumper/fender using a flathead screwdriver
5. The clip removed looks like this.
6. Do steps 3-5 to the other side
7. Start by removing the 6 pushpins on top of the radiator cover with a flat head screwdriver.
8. Remove the radiator cover
9. Remove the push pins using a flathead screwdriver
10. Remove the two bolts in front using a 10mm socket wrench
11. Remove the front bumper starting from one side, detach the fog light
12. Remove the fog light screws, keep the screws for installation on the new bumpers.
13. Do it on the other side.
14. The old fog lights do not snugly fit the new F-sport bracket. A solution that can be done is to cut a small piece off the new bracket (see picture) with a razor.
15. The fog lights should fit both brackets.
On the New Bumper
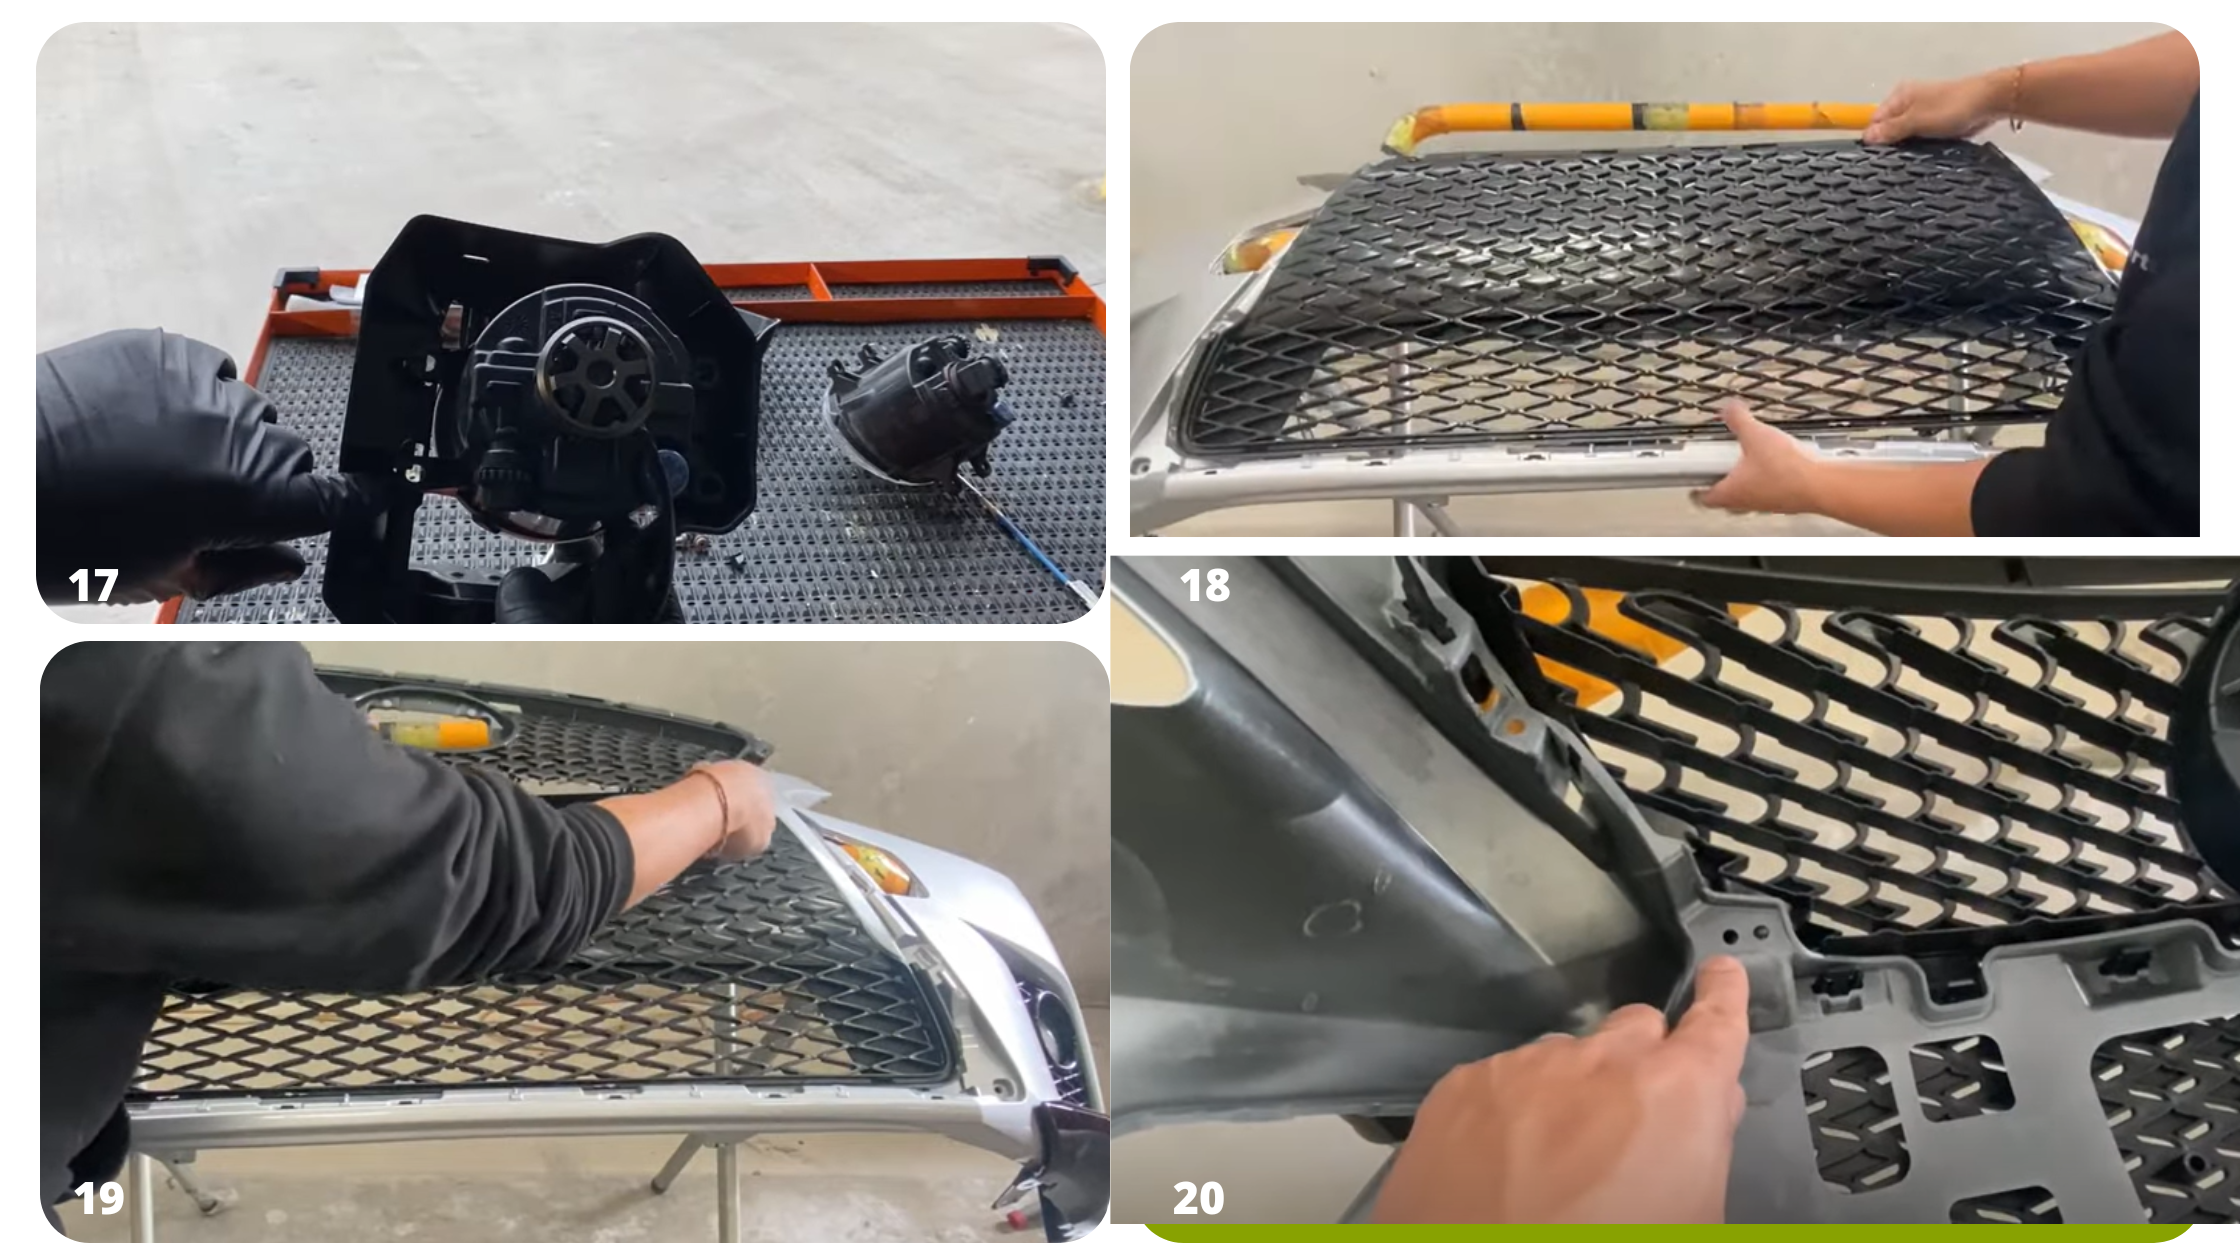
16. Put the fog lights on the new bumper, you should hear a click and then put the screws.
17. On the front side of the bumper, put the fog light covers. Make sure the prongs line up with the holes.
18. Next would be to put the black mesh on, make sure they are lined up with the holes.
19. Put the upper mesh on, make sure they are also lined up with the holes.
20. Flip the bumper upside down, on each side where the upper and lower mesh meets, put in the screws.
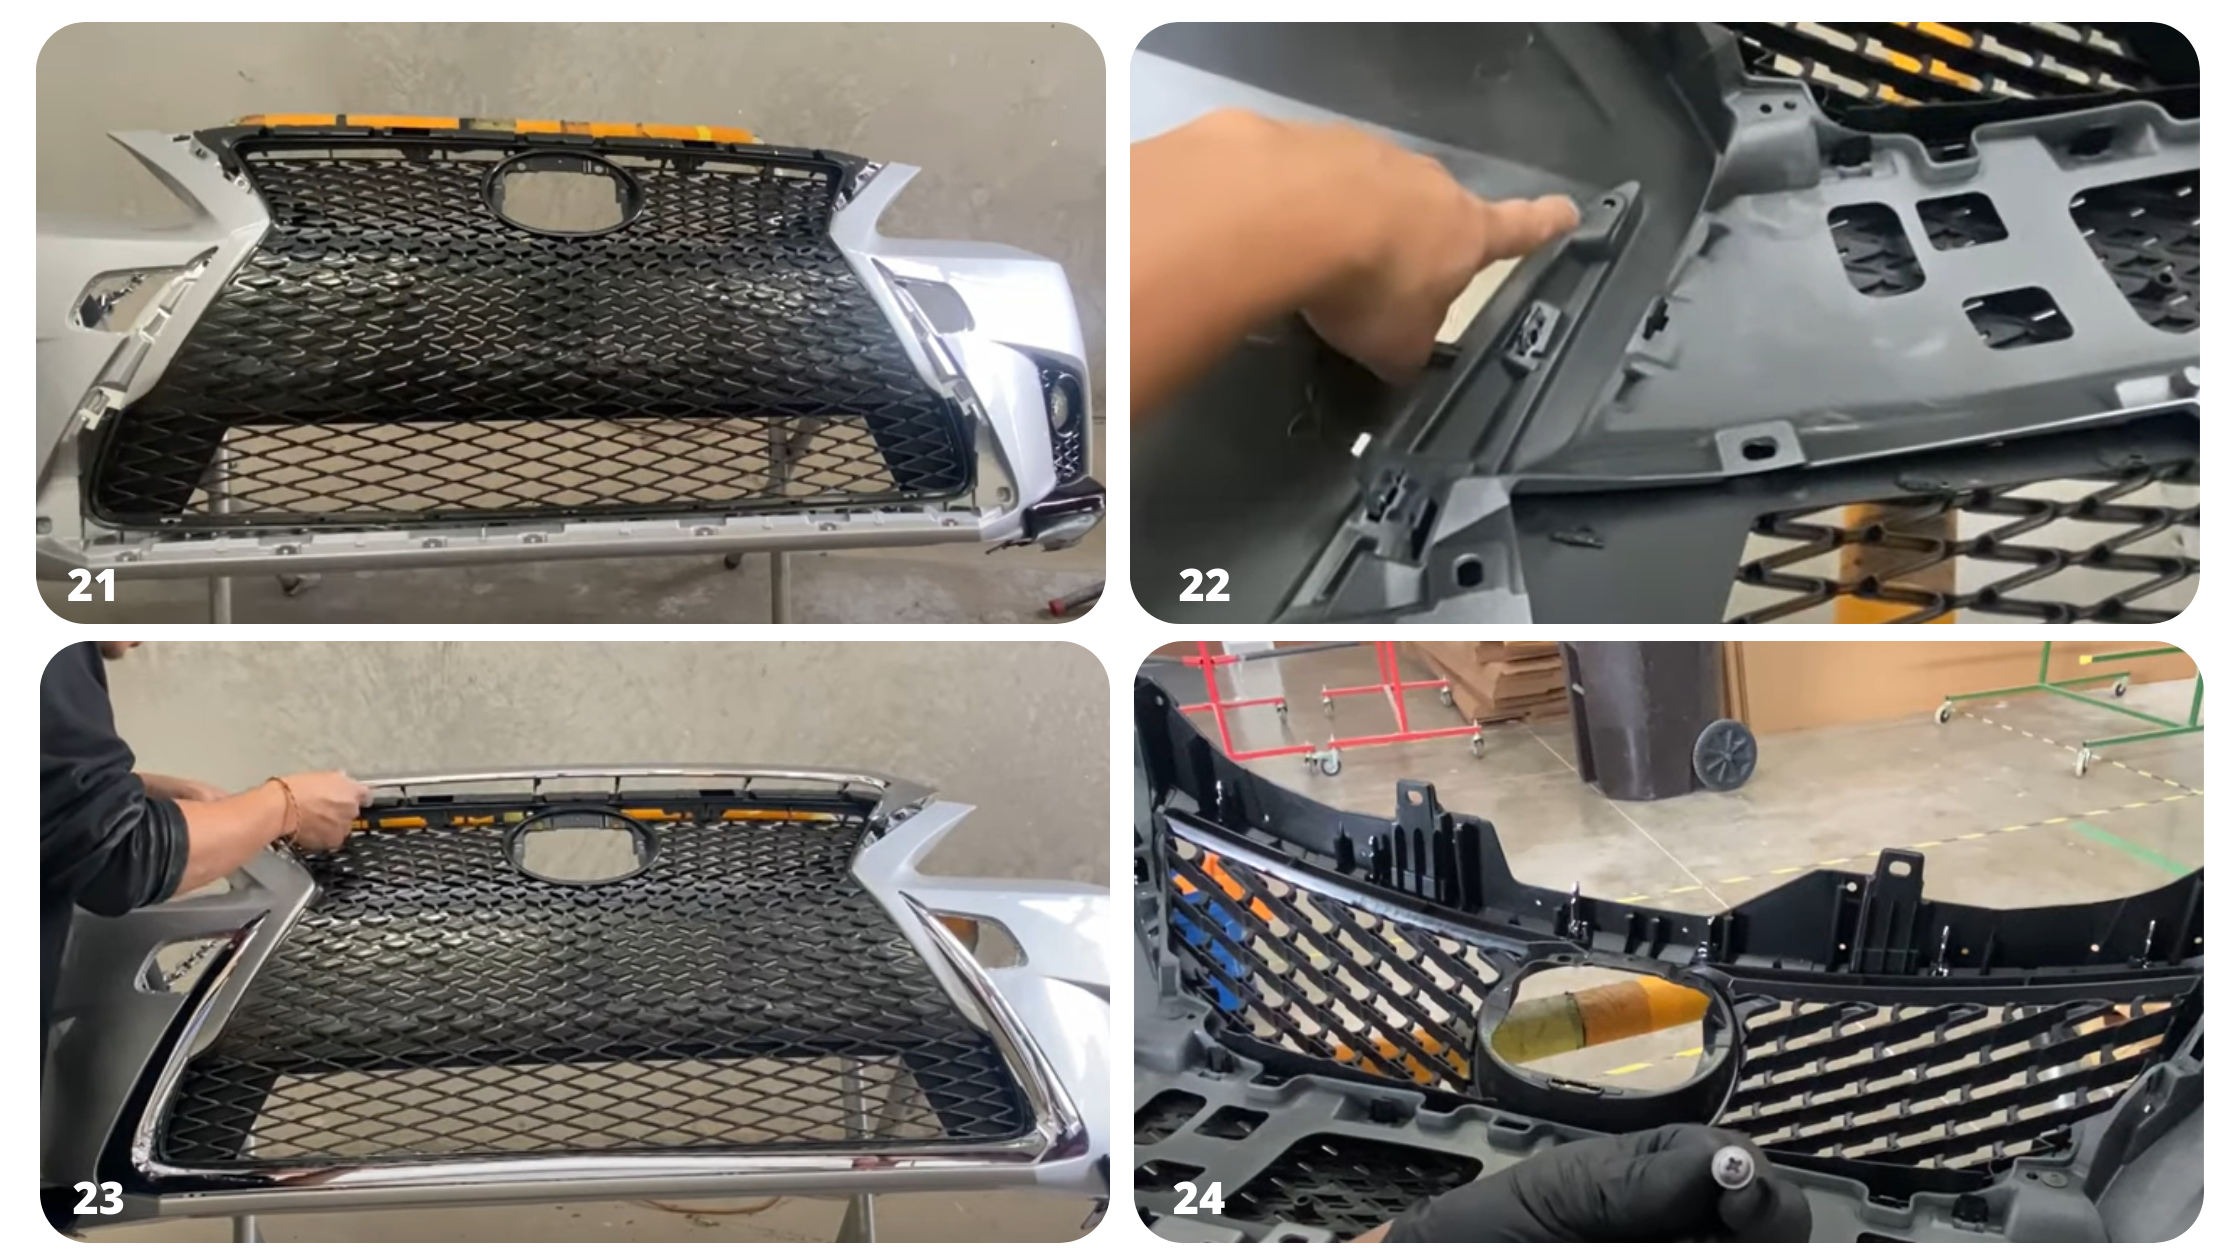
21. Flip the bumper back and have the chrome piece fitted in. Make sure the prongs line up with holes.
22. Flip the bumper again upside down, put the four screws at the back to secure the chrome piece.
23. Flip the bumper back and have the upper chrome piece fitted in. Make sure the prongs line up with the holes. You should hear a click with you push it down.
24. Flip the bumper again upside down, put the two screws at the back to secure the upper chrome piece.
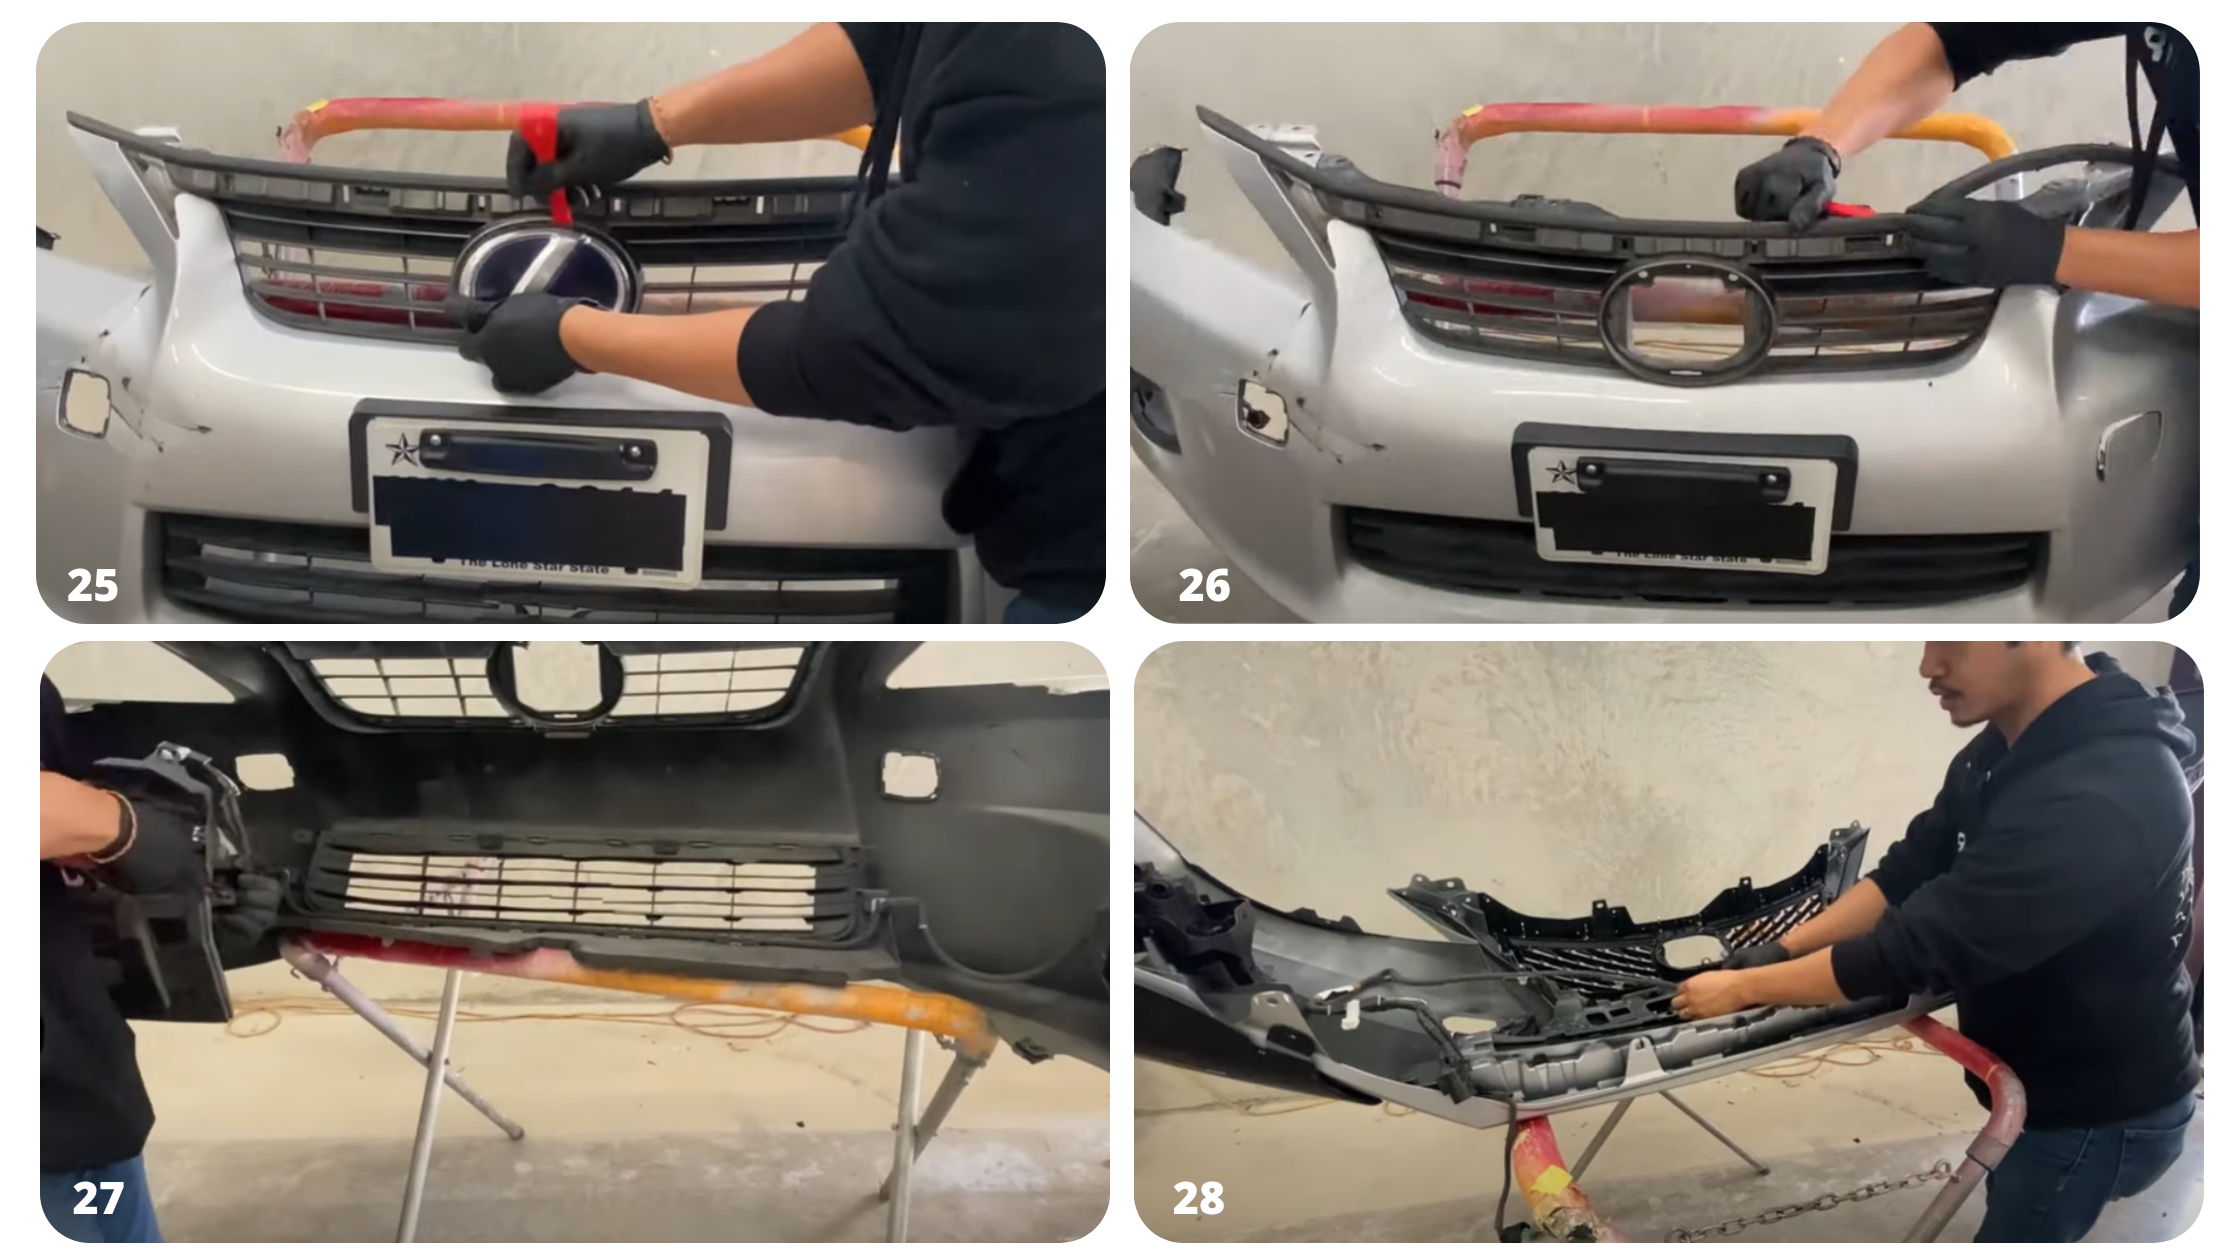
25. On the old bumper, remove the emblem by releasing the clip at the back and removing it from the front using a panel clip removal tool.
26. On the old bumper still, remove the weatherstrip using the panel clip removal tool.
27. Still on the bumper, remove the wire harness
28. On the new bumper, put the wire harness on by taping it.
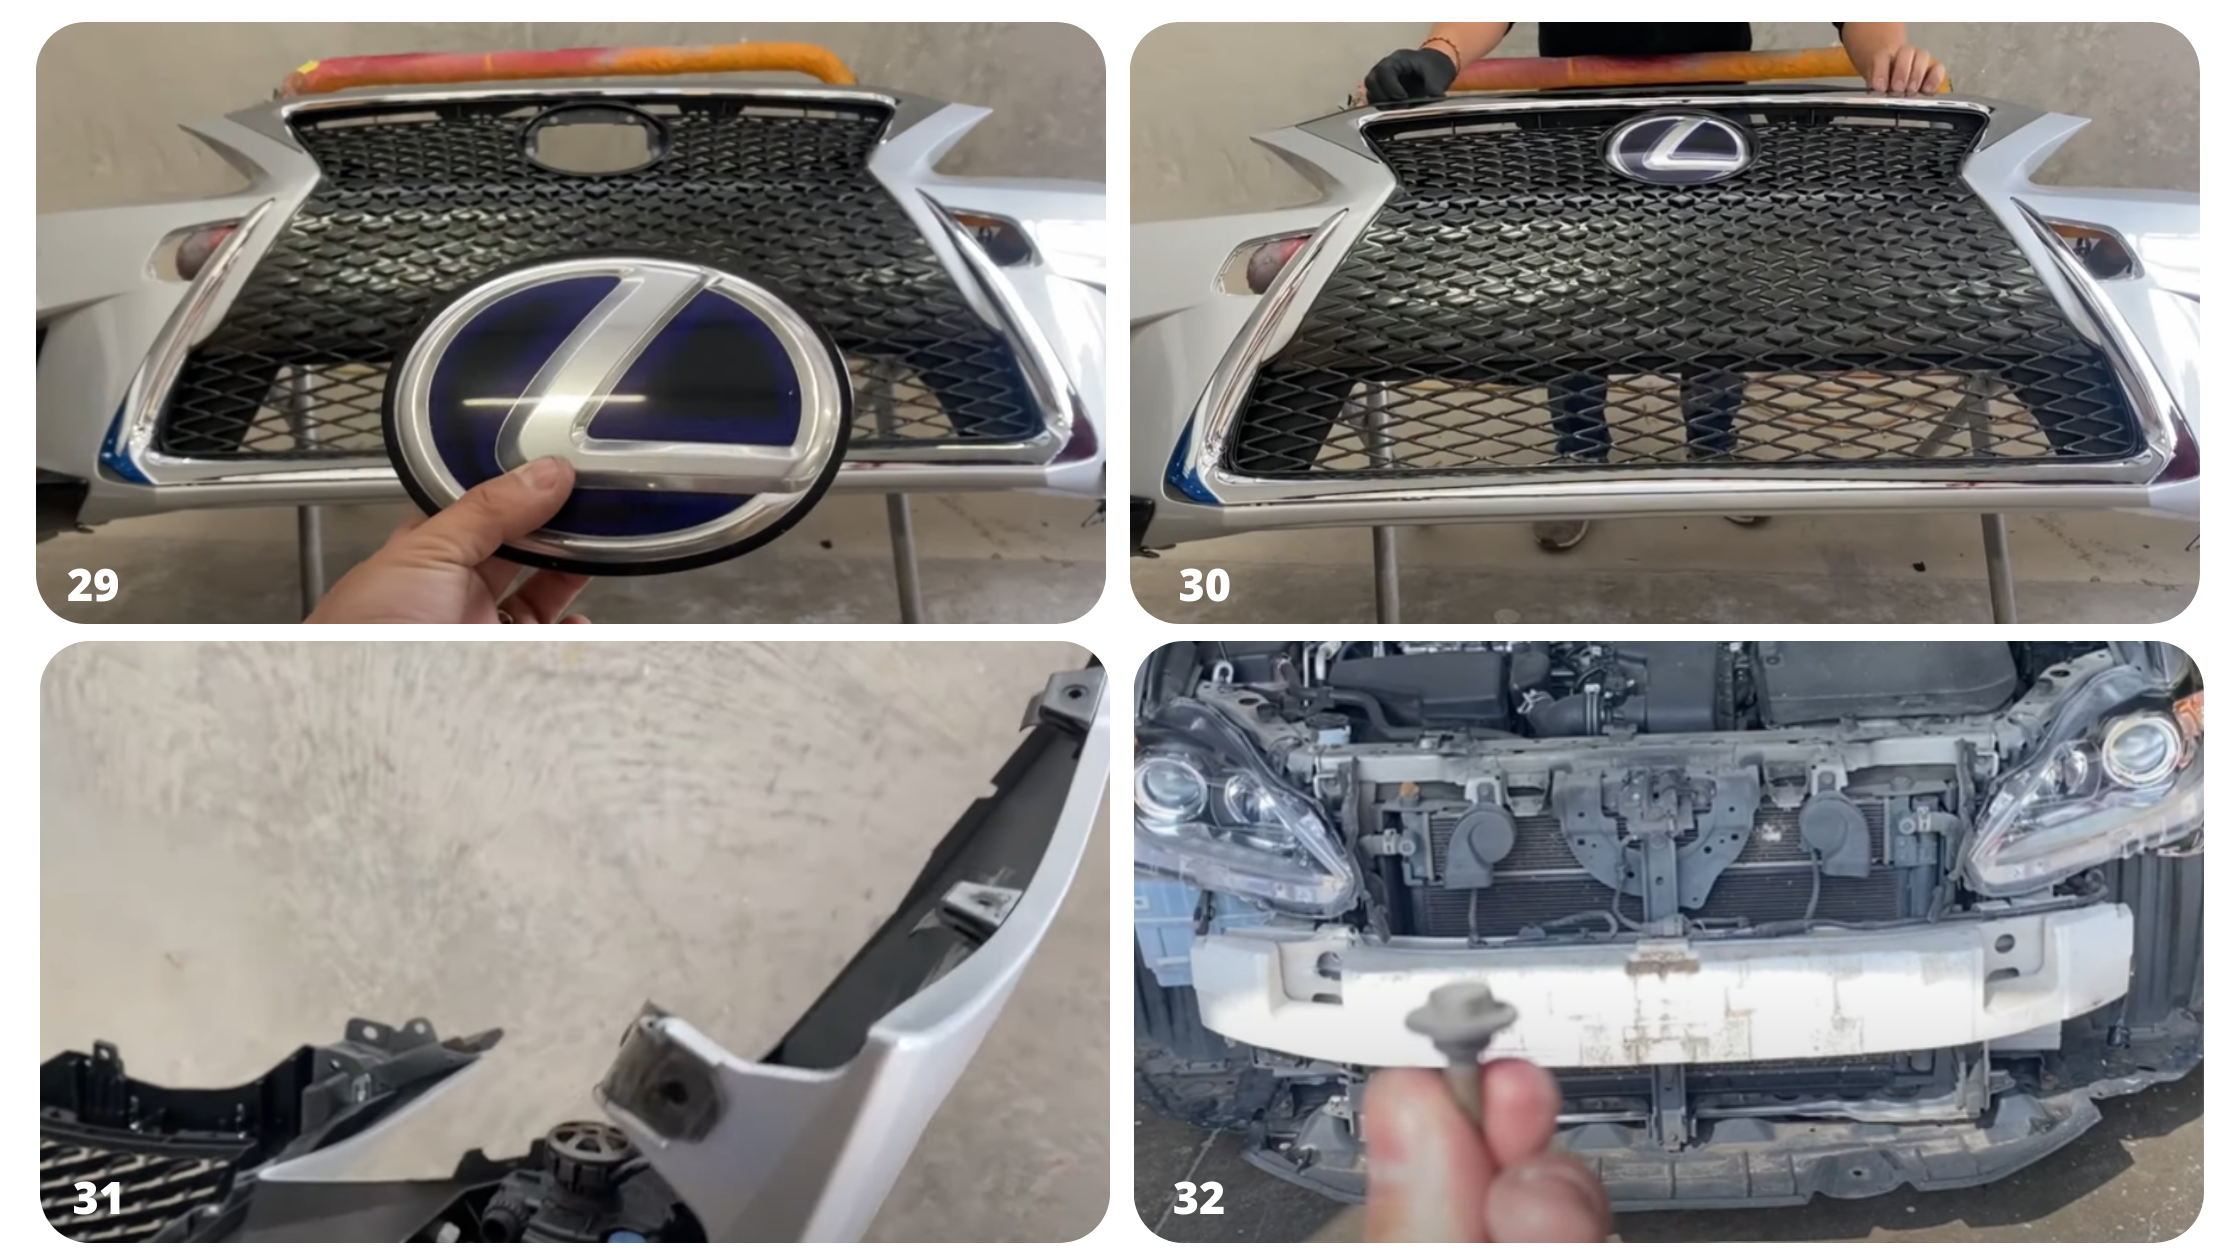
29. Put the emblem on the new bumper, you can use double stick tape. Line up the holes and the prongs and push it.
30. Put the weatherstrip on top of the new bumper
31. Transfer the u-bolts or bolt clips on the new bumper.
32. It’s now time to mount the new bumper, grab one bolt so it can be used to secure the bumper while installing.
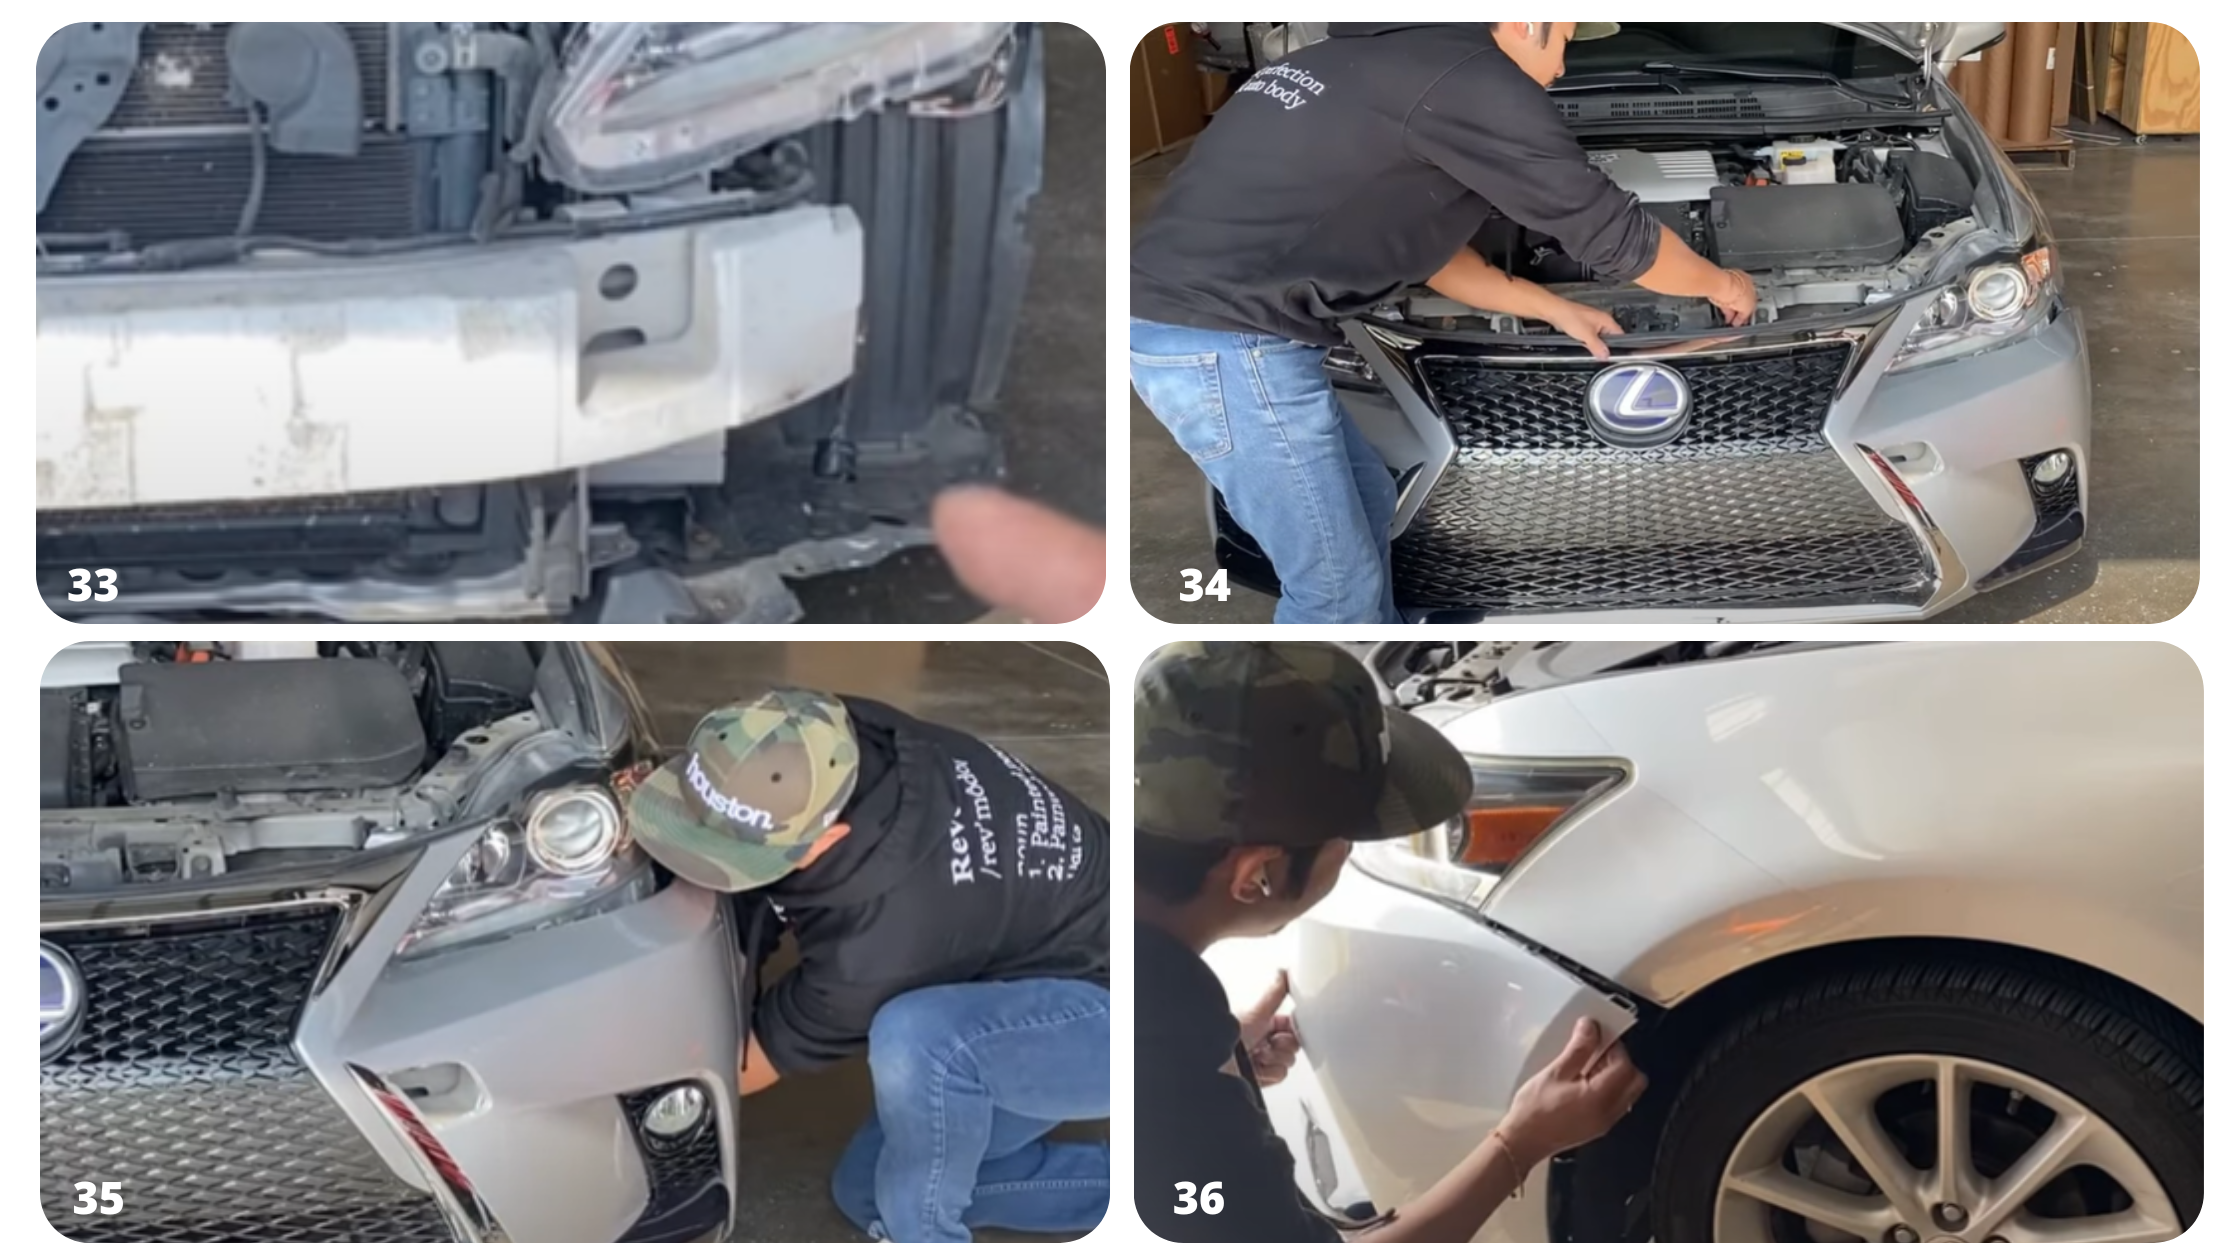
33. Make sure the fog lights are plugged in before you put the bumper all the way in.
34. When it is all lined up, secure the bumper using the bolt.
35. Plug in the foglights.
36. On each side, clip in the bumper ends to the fender/bumper retainer. In case it’s a little bit hard to clip, make sure that nothing is snagging at the bottom. Tuck the fender liner behind.
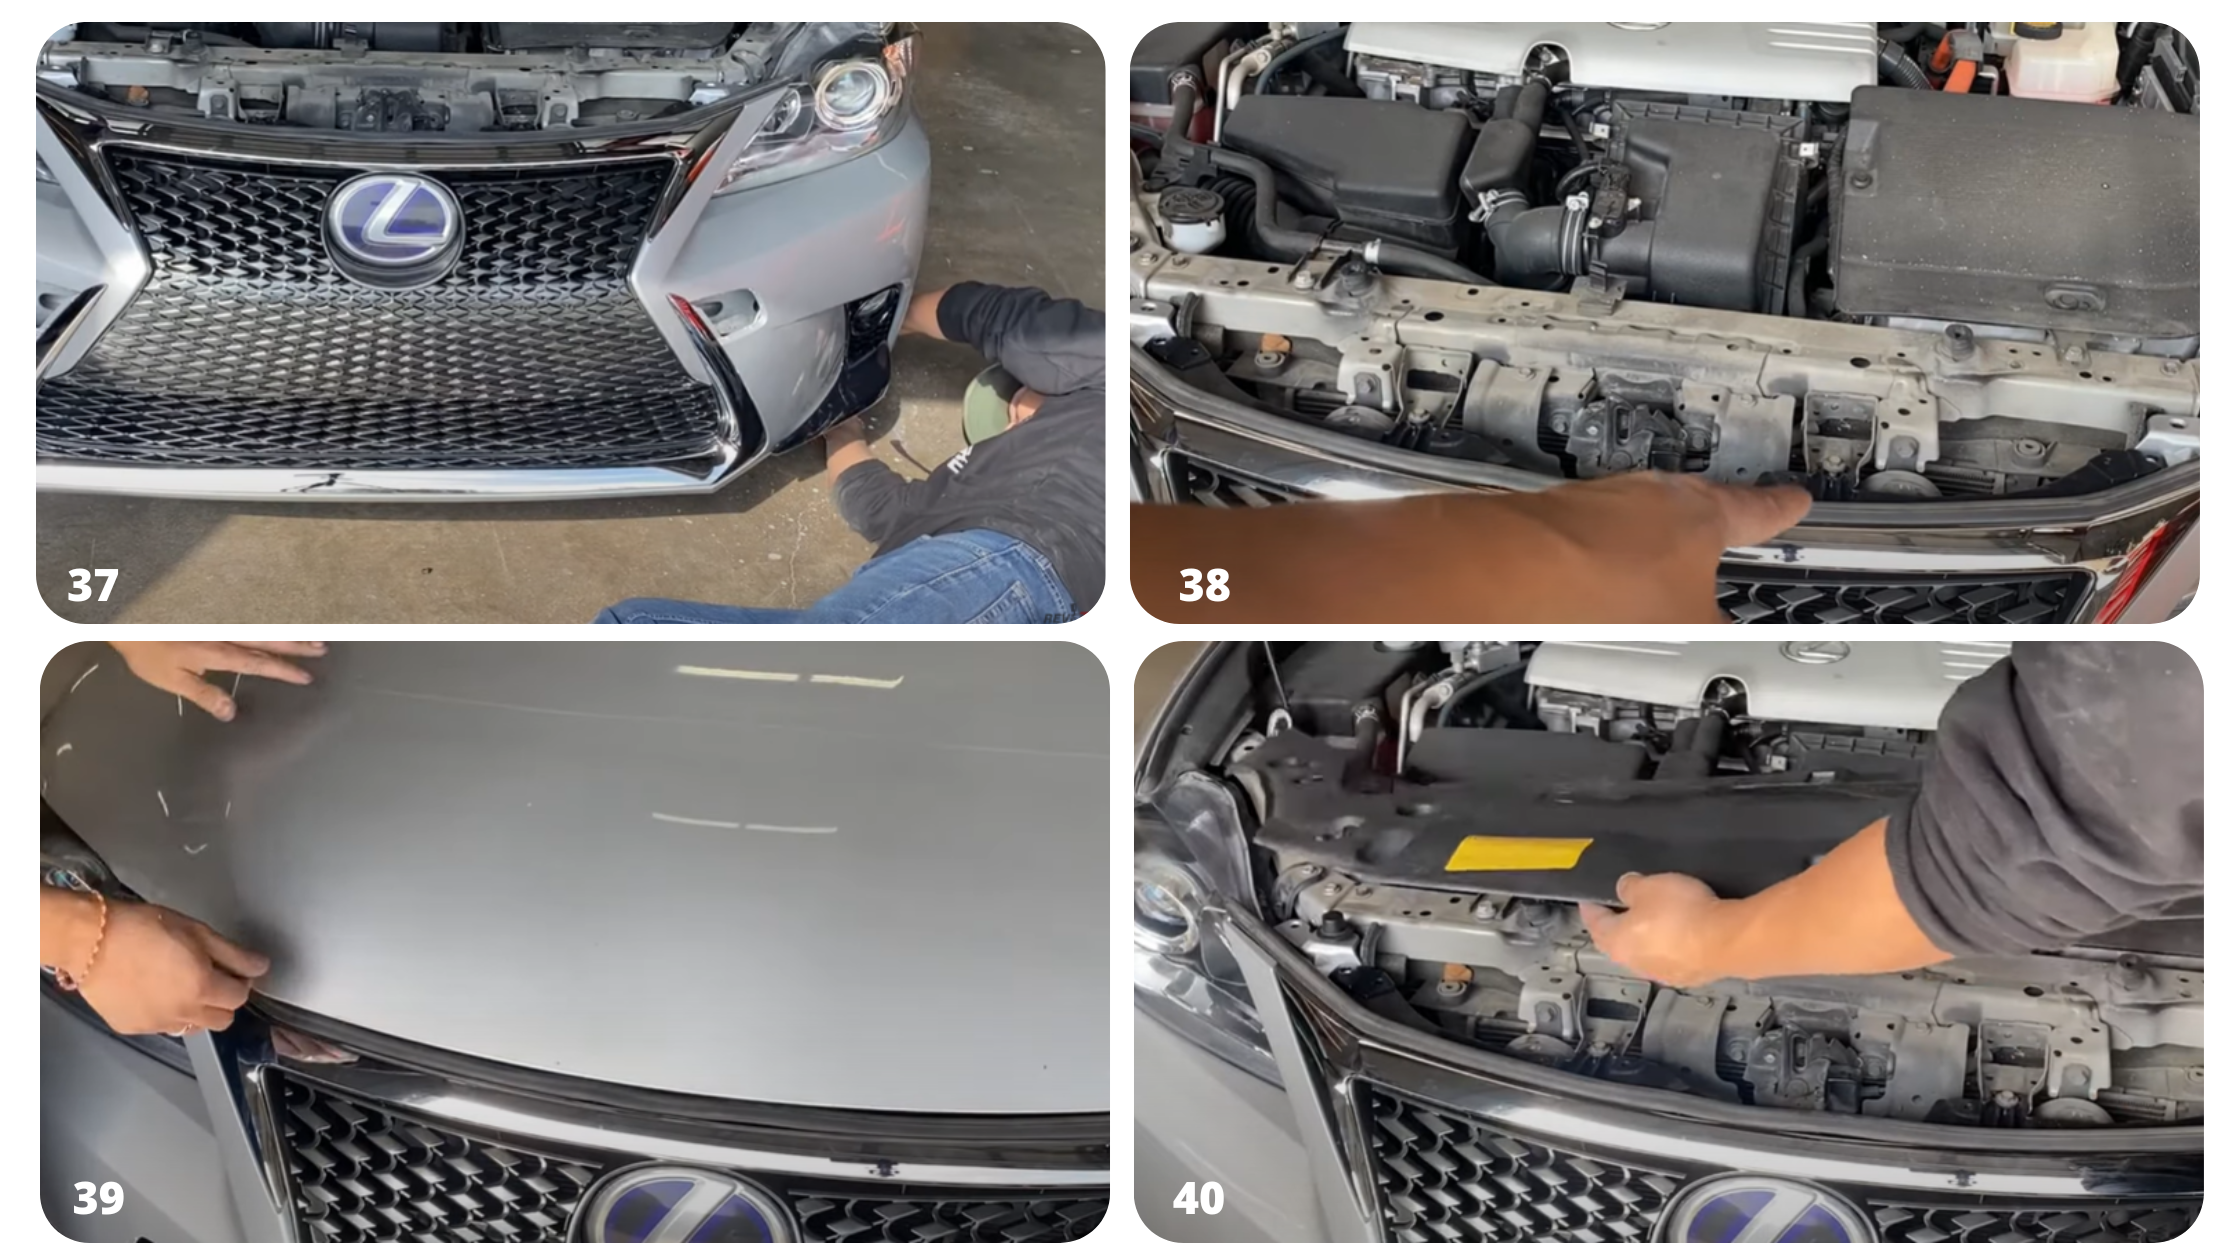
37. Put the screws underneath on each side.
38. Tighten the bolts on the top of the bumper.
39. Check the gap between the hood and the bumper if it’s looking good.
40. Install the radiator cover.
41. Secure the radiator cover using the push pins.
42. Install the tow hitch covers.
DISCLAIMER: While ReveMoto tries to make the information in this blog as accurate as possible, we make no claims, promises, or guarantees about the accuracy, completeness, or applicability of the content. No information contained in this blog shall create any expressed or implied warranty or guarantee of any particular result. All do-it-yourself (DIY) projects entail some risk. It is the sole responsibility of the viewer to assume this risk. ReveMoto is not responsible or liable for any loss, damage (including, but not limited to, actual, consequential, or punitive), liability, claim, or any other injury or cause related to or resulting from any information posted in this blog.

