Free Shipping Within 48 States!
Menu
-
-
Painted Car Parts
- Painted Bumpers
- Painted Bumper End Caps / Extensions
- Painted Door Shells
- Painted Fenders
- Painted Fender Flares
- Painted Gas Lid Covers
- Painted Grilles
- Painted Hoods
- Painted Rocker Panels
- Painted Side View Mirrors
- Painted Side View Mirror Covers
- Painted Spoilers
- Painted Tailgates
- Painted Tow Hook Covers
-
Touch Up Paint
-
Vehicle Conversions
- Chevrolet Camaro: LS/LT to SS Front Bumper Conversion (For 2010-2013 models)
- Infiniti Q50: Q50 to Q50s Sport Front Bumper Conversion (For 2014-2017 models)
- Lexus CT200H: CT200H to F-Sport Front Bumper Conversion (For 2011-2017 Models)
- Scion FRS to Toyota 86 Front Bumper Conversion (For 2013-2016)
- Toyota Tacoma: 3rd Generation TRD Hood Conversion (For 2016-2020 models)
- Toyota 4Runner: Hood and Scoop Conversion (for 2010-2022 Models)
- Toyota Tundra: Chrome Delete Conversion Kit (For 2022 Model)
- Toyota Tacoma: Rear End Caps Chrome to Painted Conversion (For 2016-2023 Models)
- Request Conversion Parts
-
Painting Services
- Customer Reviews
- Request Car Part
-
- PAINT MATCH GUARANTEE
- FAQ
- HELP
- ORDER STATUS
- 281-561-5300
- Login

Free Shipping Within 48 States!
How To Do a Chevy Camaro SS Bumper Conversion From an LT/LS
Are you ready to transform your 2010-2013 Chevy Camaro LT/LS to look like a 2010-2013 Chevy Camaro SS Model?
Here at ReveMoto, we do conversions based on customers' experiences and suggestions. From there, we research how these conversions go. We check it out by actually doing the conversions ourselves, seeing what issues can arise, and how to overcome them.
Most of the conversions we have made are on our YouTube Channel, along with our instructional videos, such as videos that explain how to install a new bumper or even how to apply touch-up paint. Painted parts and accessories are available on our website at ReveMoto.com.
Back to the Camaro conversion. The most striking difference between the two is that the lip on the Camaro SS bumper goes out a little bit. The bottom grille is also wider.
What new parts will you need for this conversion?
- New painted front bumper
- Front fascia insert or mail slot
- Lower grille
- Fender liners
These parts are included in the Camaro Conversion Kit available on ReveMoto.com
For the conversion, you'll need these tools:
- Socket wrench with 10mm and 7mm sockets and T20 torque bits
- Plastic panel clip removal tool or two flat head screwdrivers
- Medium extension
- Drill
- Rivet gun and rivets
a. Remove The Original LT/LS Bumper
The first step is to remove the original bumper. Note: keep all the bolts, push pins, and clips as they will be used later on.
1. Start at the bottom of the car There are two 10mm bolts right near the middle that need to be removed.
2. At the top of the bumper, there are six push pins that you can remove using a plastic panel clip removal tool or two flat head screwdrivers. The push pins will need to be wedged up. You need to pry it up and it should come right off.
3. Remove the two secondary 10mm bolts that can be found on top of the bumper on each end.
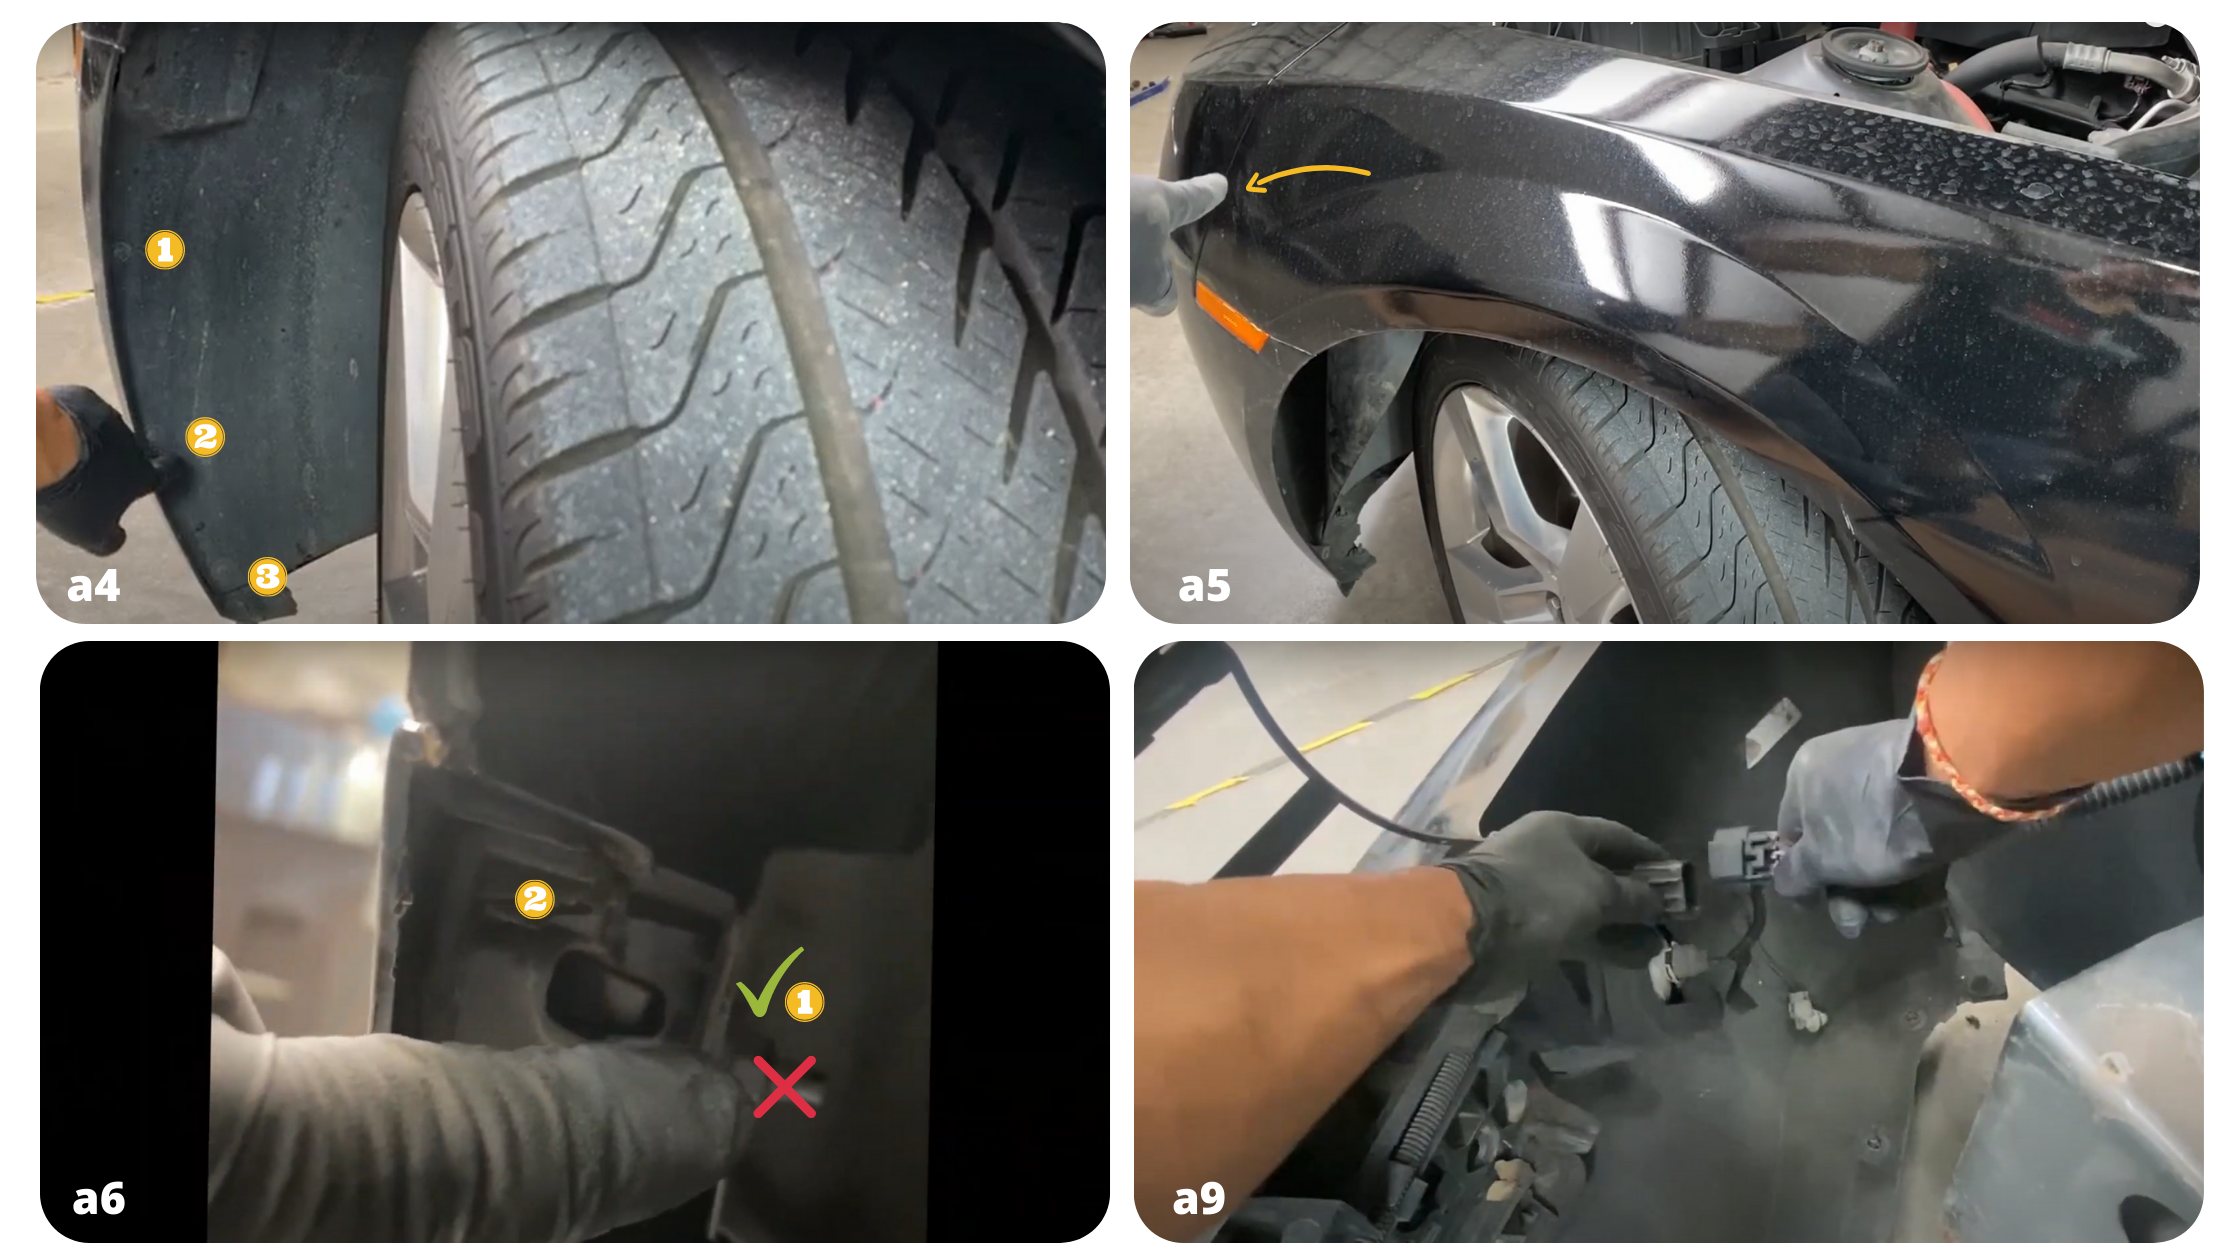
4. On the fender liner, there are three T20 torque bits screws that need to be taken off. Once those are off, pull the fender liner to the side.
5. Inside, there are 10 mm bolts where the bumper and fender meet. Use a small extension for this to loosen it up. Once it’s loose, the bolts can be removed by hand.
6. Once those are taken off, there are two more bolts that need to be removed: a secondary 10mm bolt and a 7mm bolt. These bolts are just on top of the fender, near the bumper.
7. Do the same thing on the other side. The wheels just need to be rotated to access the fender liner.
8. Now that the clips and bolts are removed on the top and bottom as well as on each side, carefully pull the bumper off.
9. Locate the main harness cable on the right side of the bumper, which connects the fog lights and the turn signals. Remove the clip on the cable, using a flat head screwdriver if needed.
b. Remove The Accessories From The LT/LS Bumper
It’s time to remove the accessories from the LT/LS that are to be used for this conversion. These are the parts that will are needed from the old bumper:
- Lower valance/lower mud guard (optional - the one on the original bumper is wider and the one on the SS is shorter in height)
- Fog lights
- Turn signal lights
- Top grille
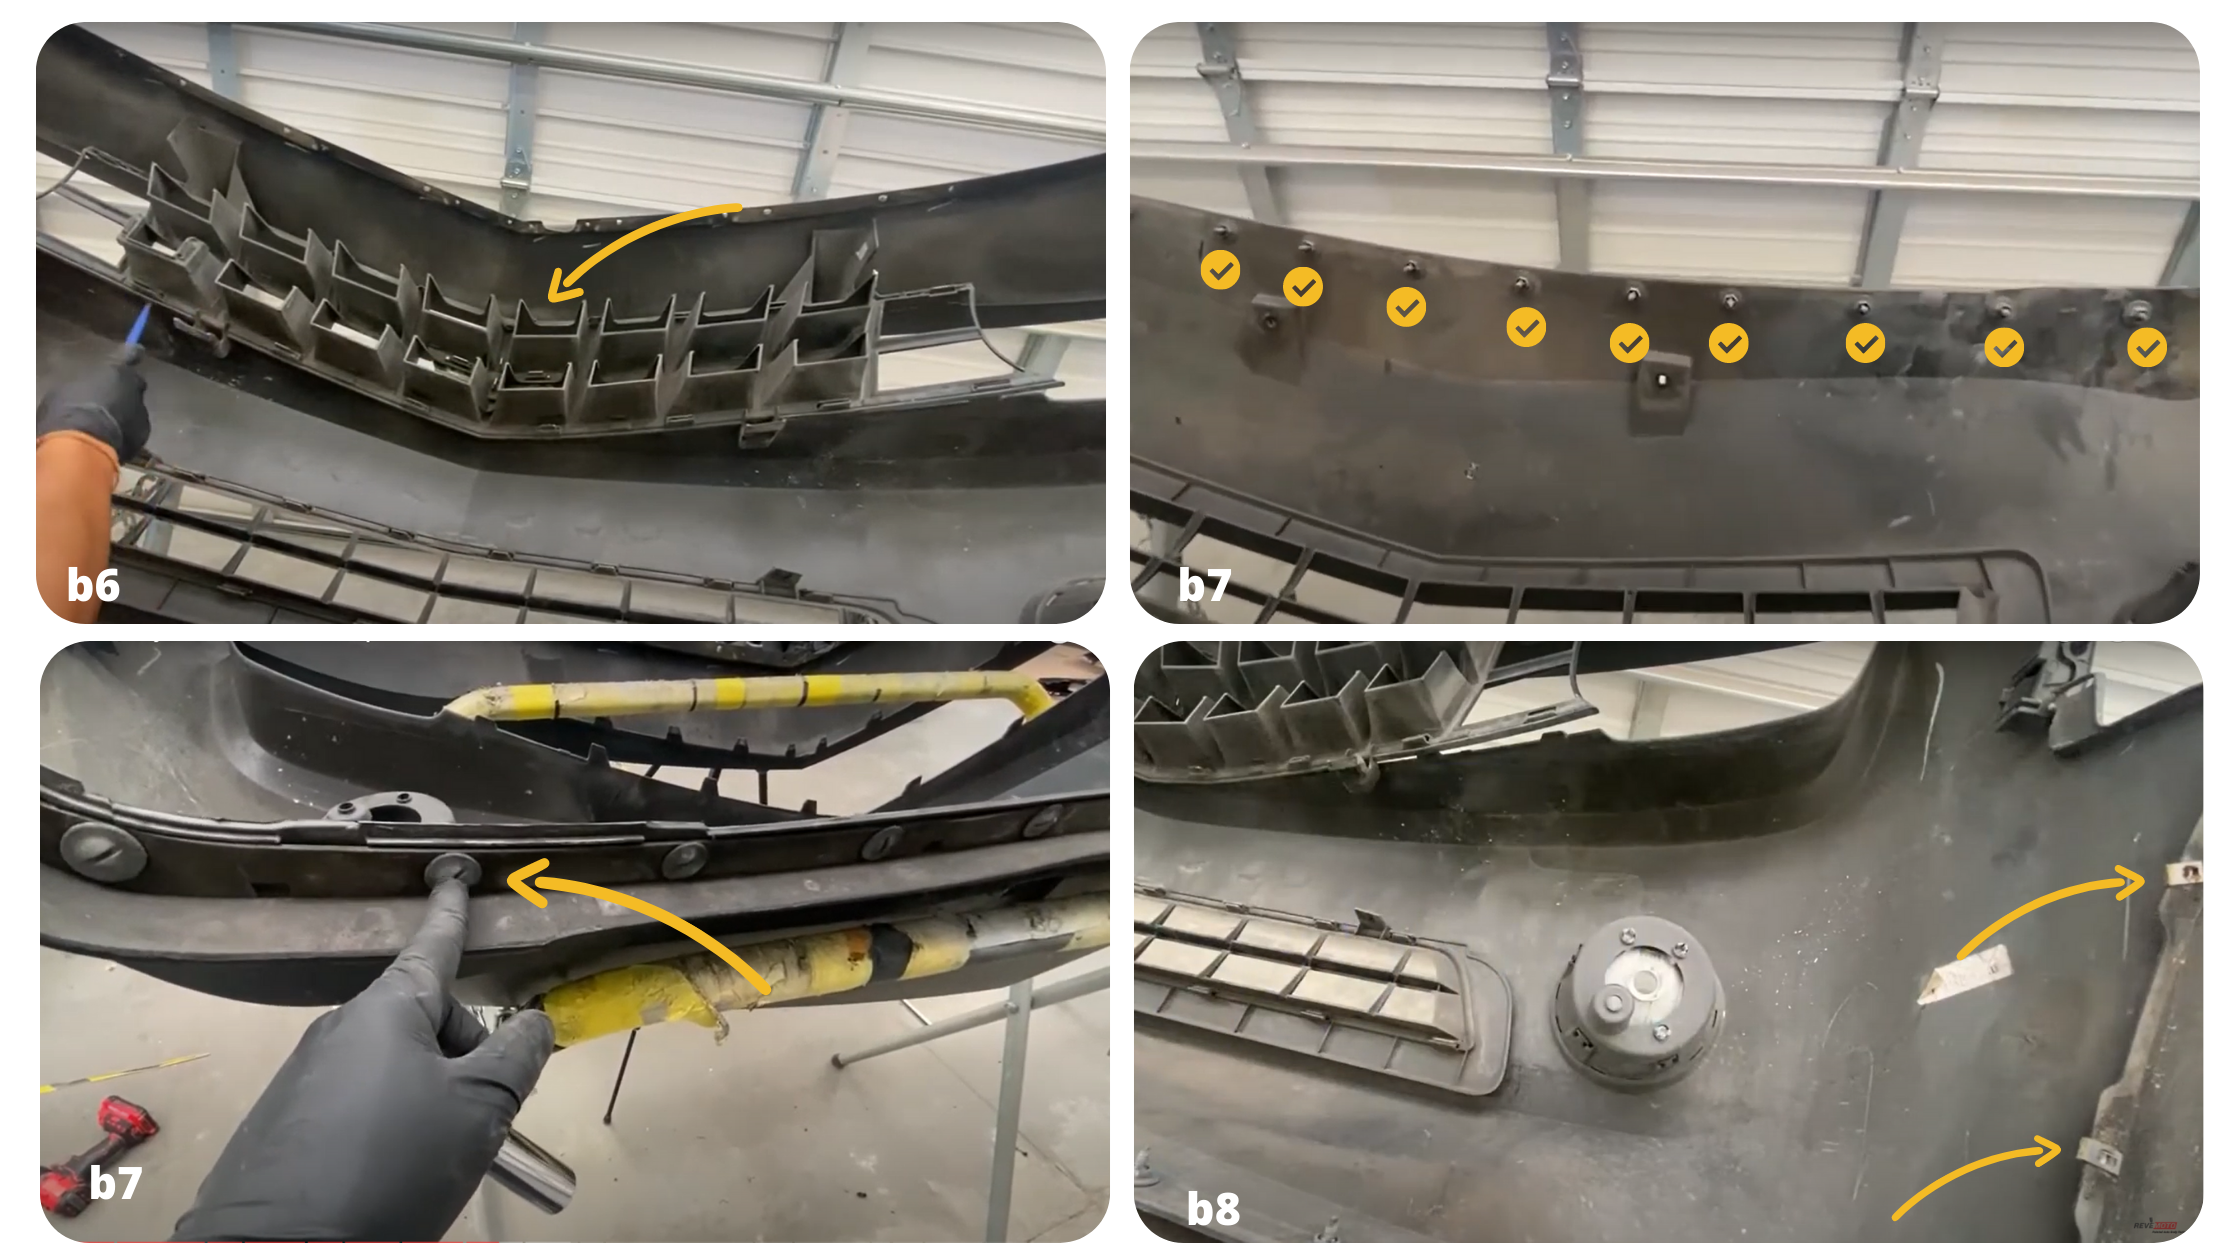
1. Use a drill to remove the rivets at the top of the bumper. Remove the filler molding on top of the bumper. There should be one on each side. Set them aside.
2. Flip the bumper to see the back of it. Take off the absorber, the one on the middle portion. This can be done by removing the tabs using a flat panel remover or a flat head screwdriver.
3. Take off the wires that connect the signal lights, fog lights, and absorber. Put the absorber aside for later use.
4. Take off the signal lights on each side by using a flat panel remover or flat head screwdriver. Set aside.
5. For the fog lights, take off the cover first by using a flat panel remover or flat head screwdriver, wedge it, and push down. Support the fog light while doing so. Do the same thing when removing the actual fog light.
6. Take off the top grille and check on the tabs that hold it. Use something flat, wedge it, and let the tabs fall off.
7. On the lower valance, take off the 14mm bolts. The lower valance is the rubber piece at the bottom of the bumper.
8. On the sides of the old bumper, there are clips you need to take off to use on the new bumper.
c. Install The Accessories on The SS Bumper
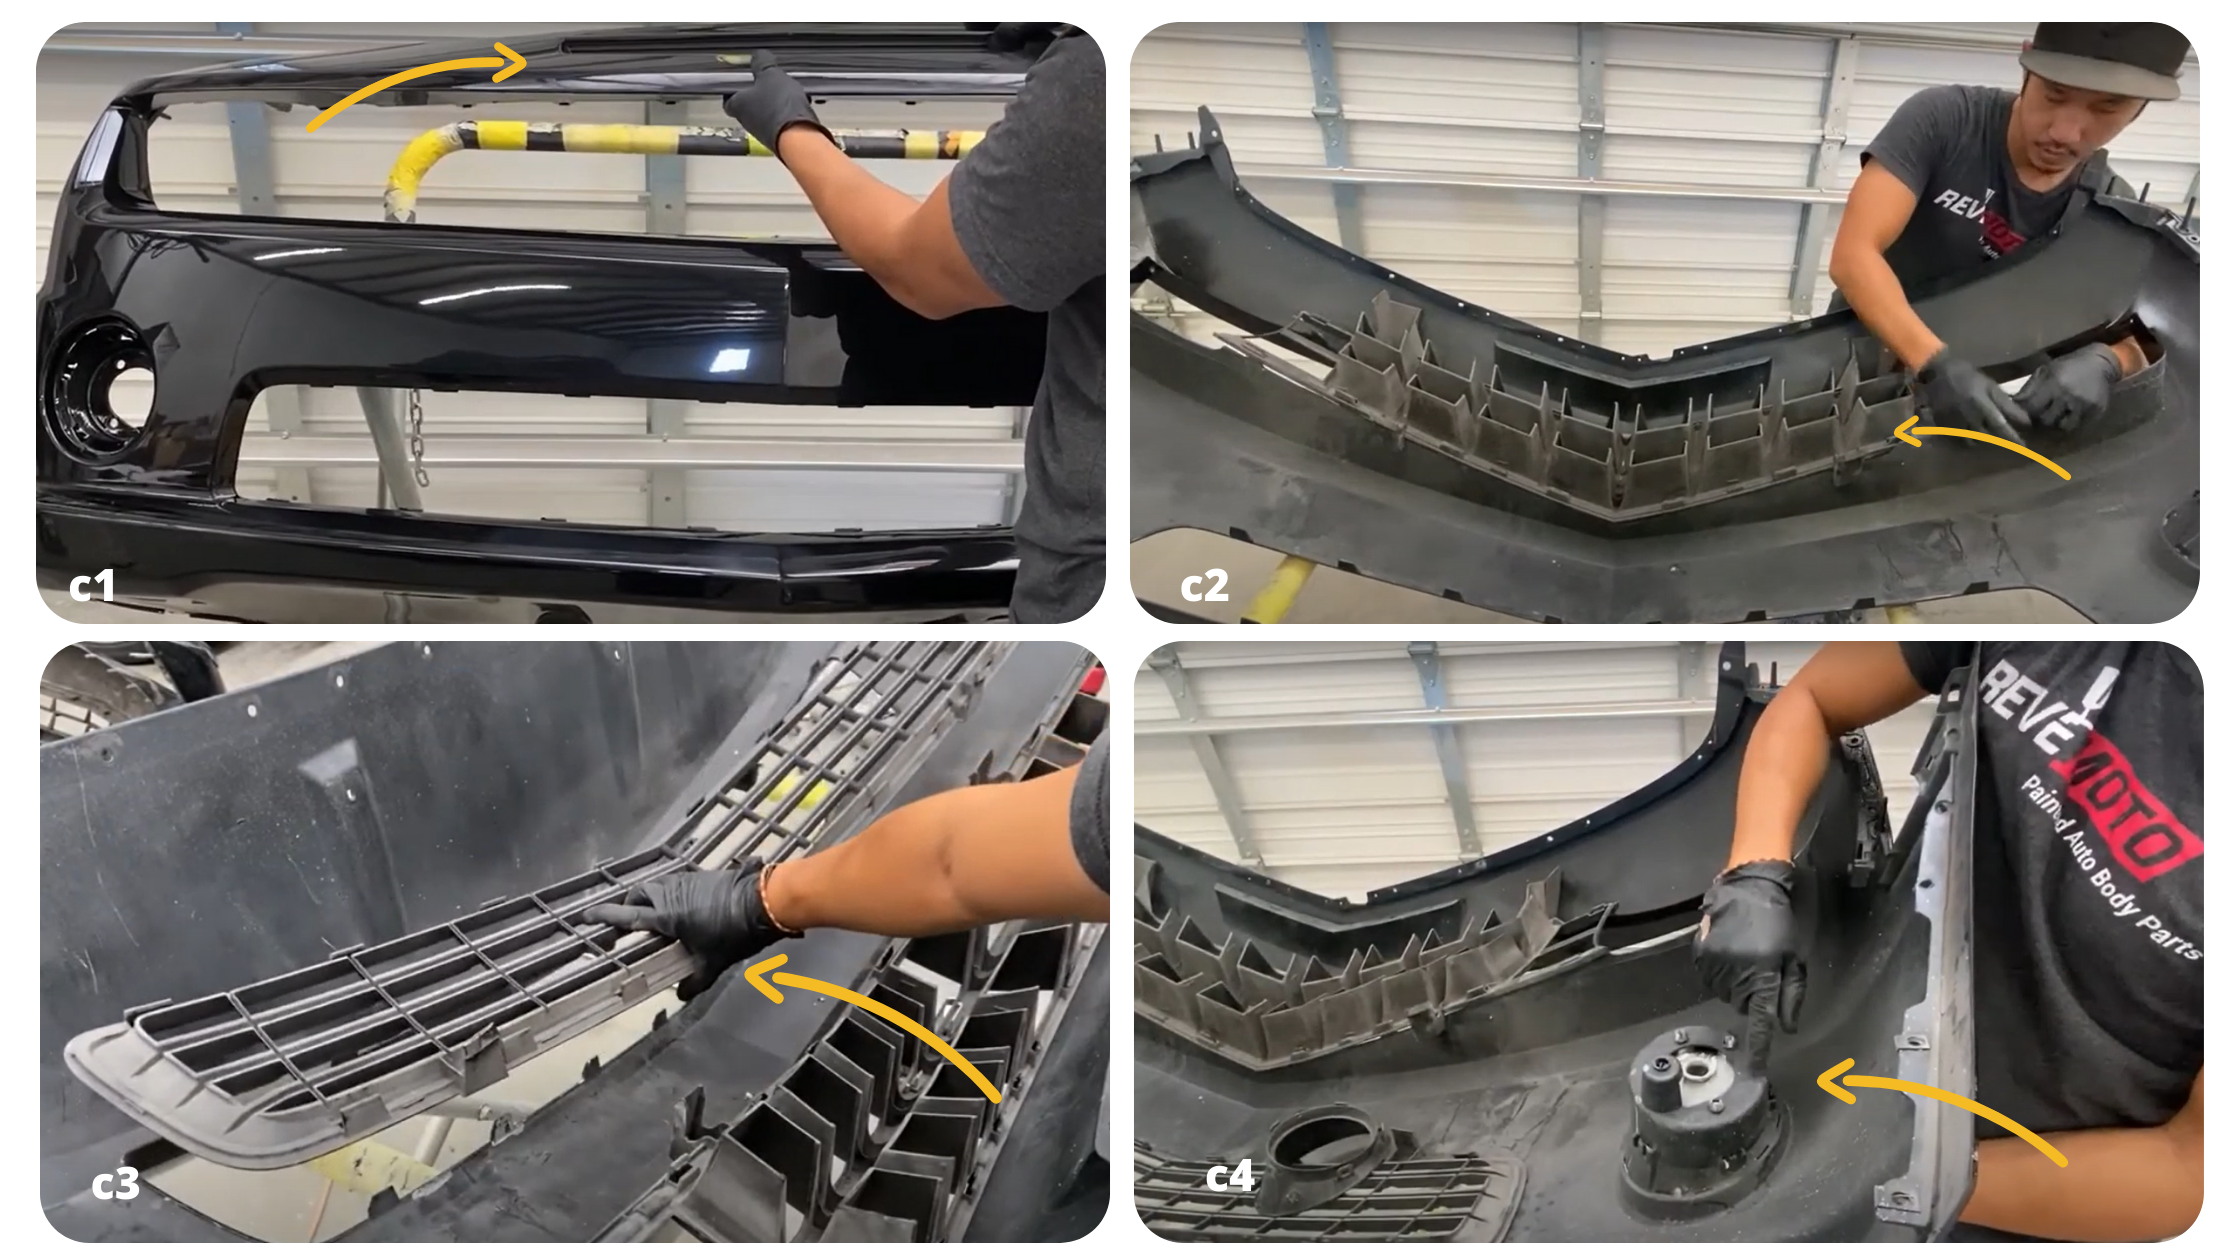
1 . Insert the front fascia insert or mail slot on the SS bumper.
2. With the bumper upside down, put in the top grille from the old bumper. Remove the current emblem on the grille, lining up the prongs first. Once it is lined up, push down the top grille and push up the front bumper. Work from top to bottom, then bottom to top.
3. Put in the new lower grille in place, line it up, push it into place, and support the bumper while installing the new lower grille.
4. Put the fog lights into place. Make sure that it’s the correct one on each side. It should be lined up. Make sure the prongs pop into place before pushing it. Finally, put in the bezel. Do the same thing on the other side.
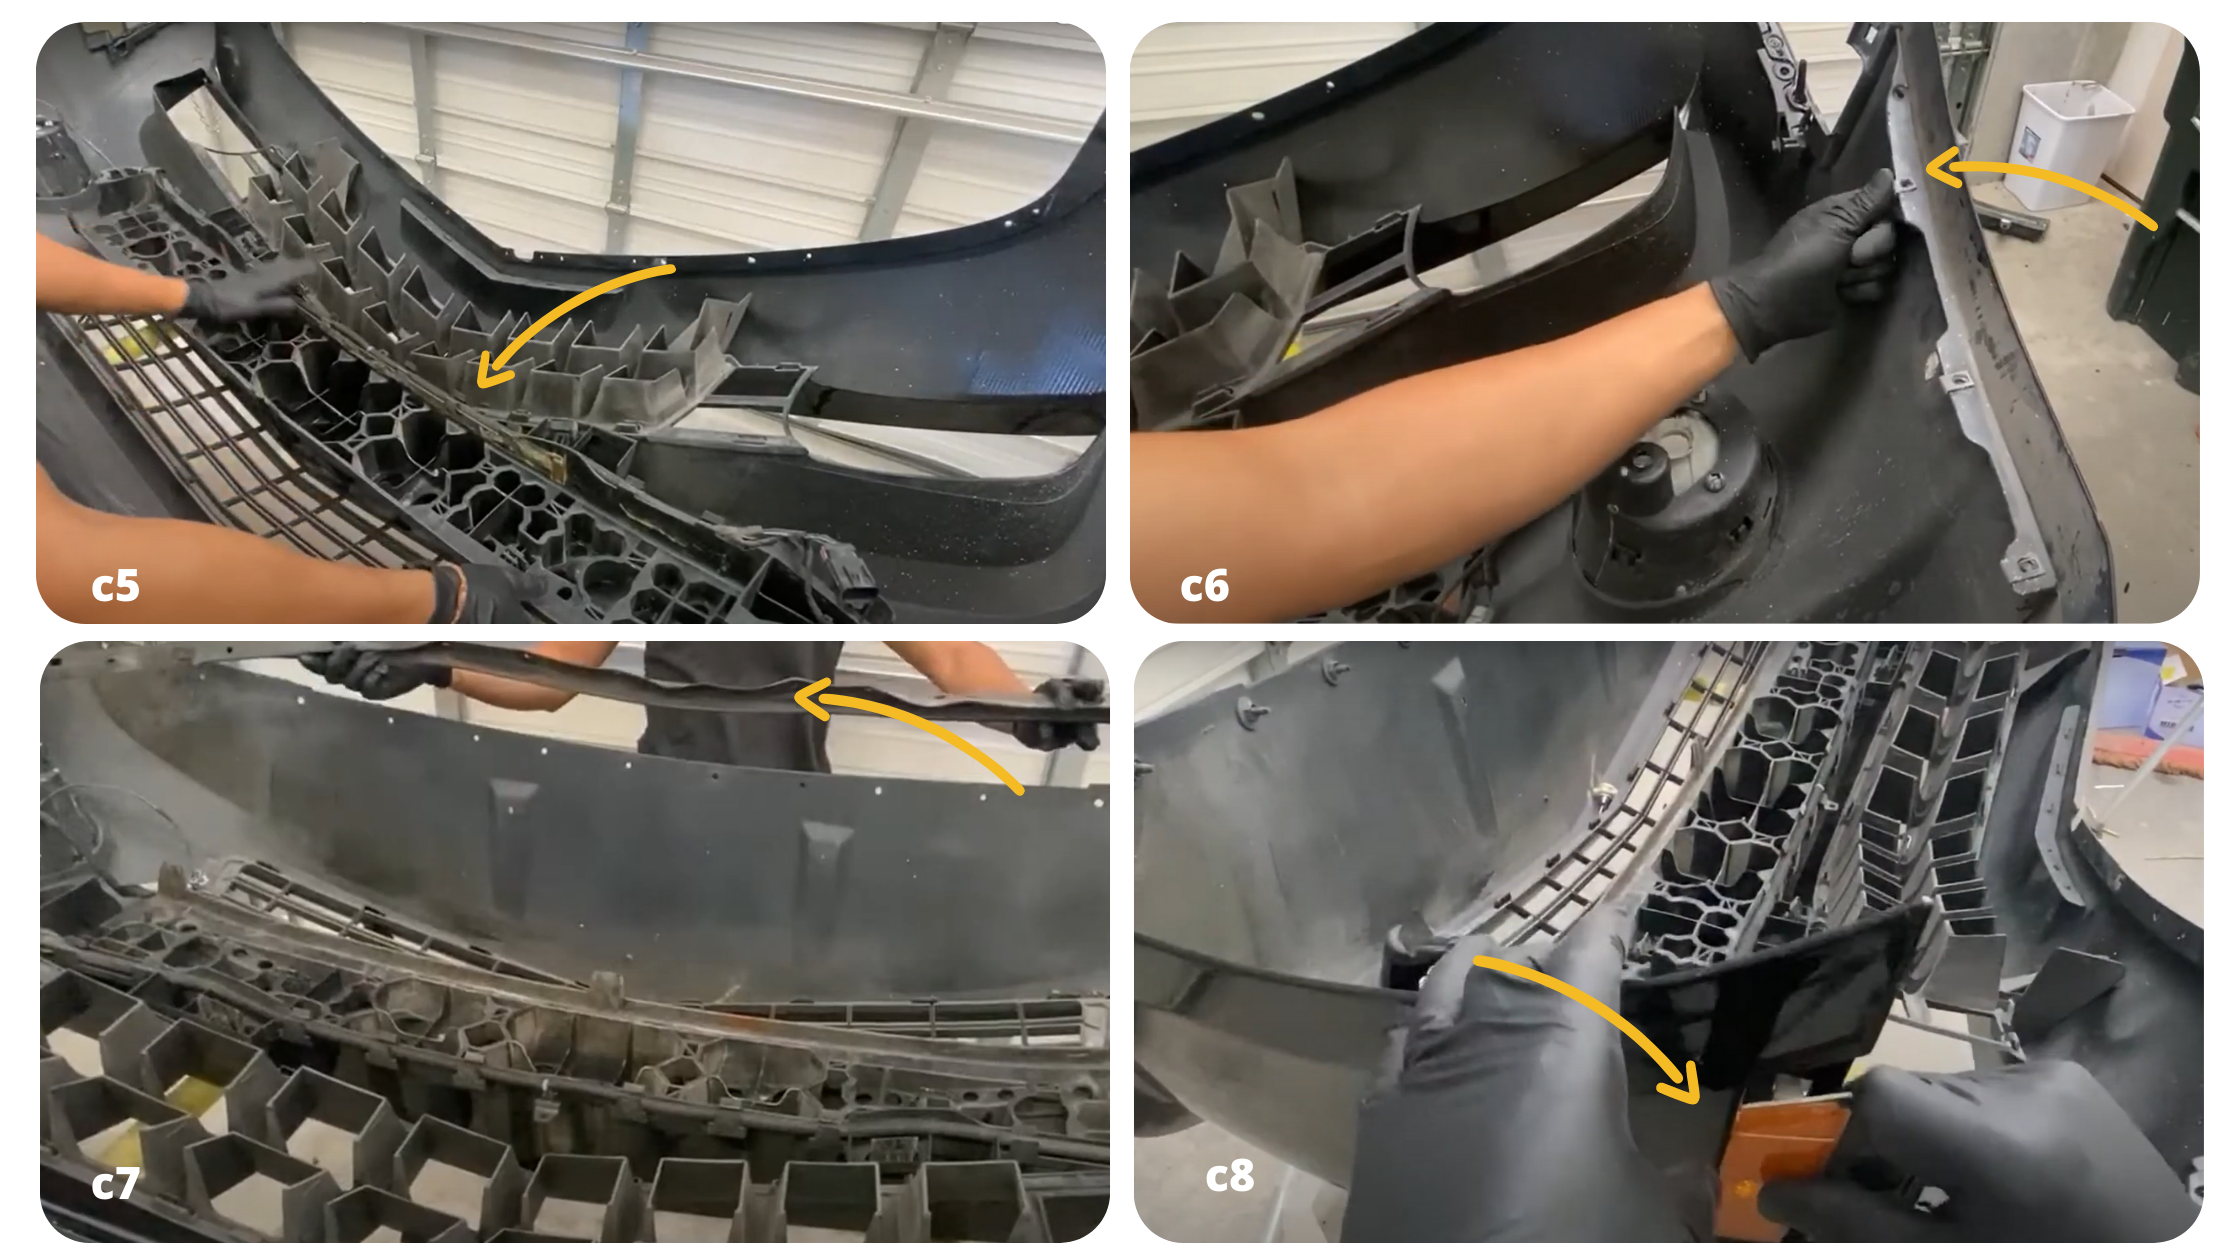
5. Add the absorber from the old bumper and make sure that it lines up. There are two prongs at the top and two prongs at the bottom. Line these up and then push down.
6. Put the clips on each side of the bumper.
7. Put the lower vailings at the bottom of the bumper. Screw and tighten the bolts to secure.
8. Insert the turn signal light into the hole, press it down, and it should snap into place.
9. Connect the wires on the absorber, turn signal lights, and fog lights.
10. Attach the filler molding or top piece on using a rivet gun. Line it up first and make sure all the holes line up. Alternatively, this piece can be secured by screwing it in with nuts and bolts.
d. Install The Camaro SS Bumper
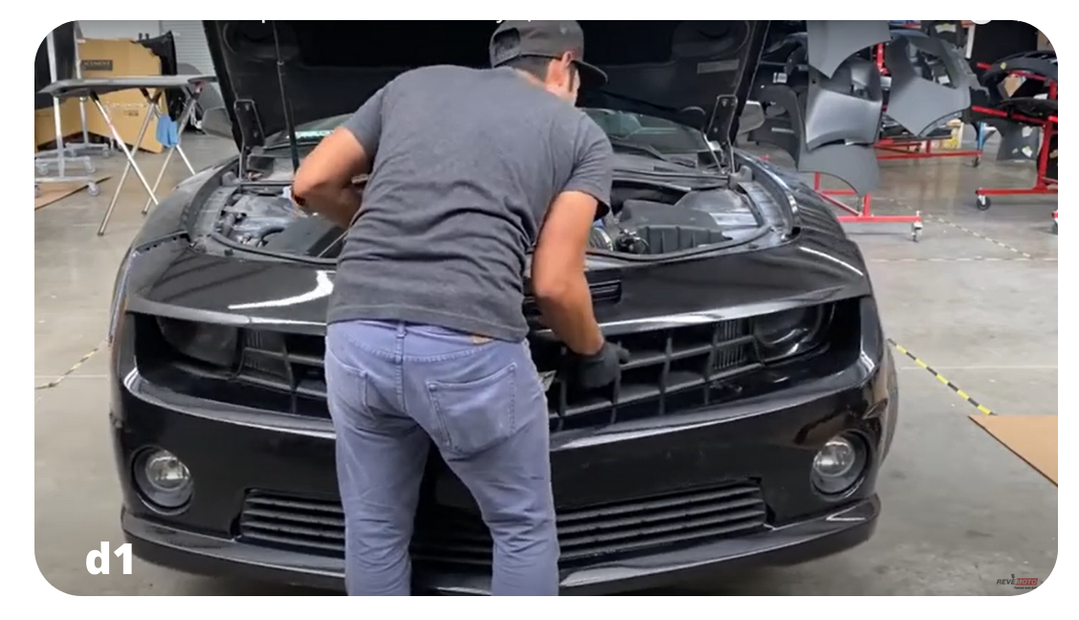
Now that the accessories are on the new SS bumper, it’s time to install it to the Camaro.
1. First, hook the harness cables together and slide them in. Make sure that the prongs line up to the holes on each side. Putting the bumper on should be smooth as long as all the prongs are lined up.
2. Once the bumper is in place, secure it on the top with bolts on the side and push pins on top.
3. Proceed with securing the bottom with those 10mm bolts.
4. The next step is to put the bracket on the corner, slide it in, and screw it on to hold it in place.
5. The 10 mm bolts are screwed at an angle. Put them on using hands first, then secure and tighten them with a ratchet. The 7mm bolts are screwed on after.
7. Once that is done, it’s time to put back on the fender liner with the torque bits. These are the three T20 torque bits from the original bumper. You may use the original fender liner, but since the Camaro SS has a wider one, it can be replaced.
So there you have it, the instructions on how to transform a 2010-2013 Chevy Camaro LS/LT to a Camaro SS.
DISCLAIMER: While ReveMoto tries to make the information in this blog as accurate as possible, we make no claims, promises, or guarantees about the accuracy, completeness, or applicability of the content. No information contained in this blog shall create any expressed or implied warranty or guarantee of any particular result. All do-it-yourself (DIY) projects entail some risk. It is the sole responsibility of the viewer to assume this risk. ReveMoto is not responsible or liable for any loss, damage (including, but not limited to, actual, consequential, or punitive), liability, claim, or any other injury or cause related to or resulting from any information posted in this blog.


